CT Scanning Reveals What Isn’t There in 3D Printed Parts
3D Engineering Solutions offers CT scanning as a powerful nondestructive testing (NDT) solution for inspection. For 3D printed parts, sometimes revealing the space inside can be just as valuable as mapping what was printed.
Additive manufacturing (AM) makes it possible to incorporate complex internal features, but there is no point in specifying precise internal parts made this way if they can’t be inspected. Computed tomography (CT) scanning has become a powerful tool in the AM arsenal, offering a nondestructive testing (NDT) option to validate the geometry and material properties of a 3D printed part all the way through. And in 3D printing, often the most important aspect of a part is what’s left out. As James Bergner explained to me, there are certain instances where empty spaces within a 3D printed part—the fluid channels, the openings created by lattices, the hollow areas—are of greater interest than the solid regions of the part.
CT Scanning for Additive Manufacturing
Bergner is senior project engineer and NAS 410 Level III at 3D Engineering Solutions, a Cincinnati, Ohio-based company providing scanning and metrology services across a range of industries. CT scanning is a relatively new addition for the company, which established its facility north of the city in 2007 and seven years later added its first CT systems. The facility is now equipped with four industrial CT scanners from Nikon Metrology, consisting of two metrology-grade MCT225 scanners, a larger XTH450 CT scanner with a higher-powered rotating target source, and an XT V160 used primarily for PC boards and small parts. The CT scanning lab is supplemented with blue light, laser and optical scanning; probing; and coordinate measuring machines (CMMs), all to aid the company in finding the best combined inspection approach for each application.
Inspecting AM parts has now become a core competency for 3D Engineering Solutions, alongside inspection of castings, archeology and art, and conventionally manufactured parts for industries that include aerospace, automotive, medical and rail transportation.
But while the company is currently inspecting some small-volume AM production jobs and hopes to take on more, development projects are equally important. Many of 3D Engineering Solutions’ AM customers are pursuing CT scanning as a way of learning more about their 3D printing processes. Though the scan itself is an NDT method, it is not uncommon for the company to scan test coupons or tensile samples, rather than complete parts, which customers then destroy in the process of validating or fine-tuning their additive manufacturing processes.
3D-printed parts share similarities with castings, but there are some AM-specific issues to look for, Bergner says. Generally, these fall into two camps: material in unexpected places (trapped powder and inclusions, for example), or a lack of material where it should be (cracks, voids and pockets of unsintered powder). CT scanning offers an alternative to cutting pieces apart in order to find these problems.
But CT alone isn’t a one-and-done solution. The company often uses a combination of techniques and scanners to drill down into potential trouble areas. It might, for instance, perform a fast CT scan of a complete part on one of its lower-powered systems just to look for possible cracks. If any are detected, that portion of the part can be re-scanned at a higher resolution on a more powerful machine. Going one step farther, the company can also help customers determine whether a defect is significant—a crack in an area that will be machined away may not be an issue that needs correcting, for instance.
Capturing Space
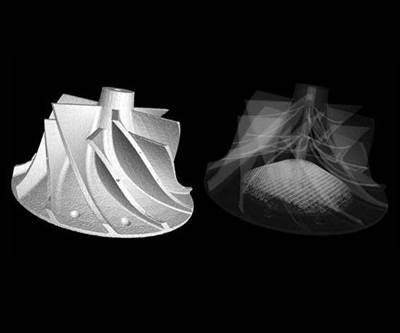
But beyond determining the physical bounds of the part, what CT scanning allows 3D Engineering Solutions to capture is space. Using a combination of CT scanning and software from Volume Graphics, the company can analyze the volume of open space in a given part, examining intentional openings like lattices and unintentional ones like areas of porosity that could result in leakage.
“It is very possible that small internal changes [related to feature] size or location, surface roughness, blocked passages or even the shape of the structure could change airflow and fluid dynamics,” Bergner says. “With the newer modeling software that is available engineers can get really close in their designs, but these [inspection] tools allow them to see what is really happening on a real sample.”
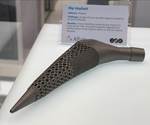
The medical industry offers one application where space is important. Picture, for instance, a 3D-printed spine cage filled with intricate lattices. The porosity of this implant is determined by its ratio of material to open space. While implants are designed with a desired porosity level, that may differ from the actual ratio as-built. Using CT scan data interpreted with the Volume Graphics software, it is possible to find what Bergner calls “the true porosity” of the part. For an example like the spine cage, porosity is an important characteristic that will help determine how well the patient’s bone will grow into the implant, whether stress shielding is likely to occur, and, ultimately, how long the implant is likely to last.
The process works like this: The part is CT scanned and the resulting data transferred into the Volume Graphics software. Then, 3D Engineering Solutions runs a “cell analysis” that essentially fills all the open space within the part, using color coding to show each independent cell or channel. The software can then use that fill information to determine the overall volume of the part’s envelope and calculate its porosity. Customers receive this data through a GoToMeeting or in-person session, and also receive a viewing tool that allows for slicing the part into cross-sections for a more detailed look at specific portions.
There’s been a recent “push toward metrology,” says Rob Glassburn, VP of operations, as more additive manufacturing users pursue production-motivated certifications such as FDA approvals. There’s usually a startup period for AM customers where CT scanning overlaps with destructive testing to confirm part properties, but over time most come to trust the CT information alone. “We want to be experts at giving them the data they want,” he says. That data will be key not only for validating parts now in development, but to ensure consistency and repeatability as they move into production.
Related Content
Sintavia Develops Niobium Printing Technology for Aerospace, Defense
C103 material parameter specification is said to enable full alloy adoption across defense and space applications.
Read MoreEOS, Hyperganic Partnership to Elevate Space Components
Integration of Hyperganic Core, an AI-powered engineering software platform, with EOS’ digital additive manufacturing solutions aims to advance the space propulsion field.
Read MoreEOS, Hyperganic Collaborate on Design, Performance of Space Propulsion Components
By creating a truly digital workflow, the companies aim to utilize additive manufacturing’s design freedom to create part structures and applications that were impossible to manufacture using traditional production processes.
Read MoreArburg Freeformer 750-3X 3D Features Larger Build Chamber
Formnext 2022: The Freeformer 750-3X 3D provides more space inside the build chamber for larger components.
Read MoreRead Next
How Topology Optimization Could Be the Key to Longer-Lasting Hip Implants
Hip stem implants must support the mechanical loads of the patient’s lifestyle, but should also avoid stress shielding. A team from Altair leveraged simulation, topology optimization and 3D printing to design an optimized hip stem that meets both conditions.
Read MoreVerifying Structural Integrity of Metal 3D-Printed Parts
X-ray computed tomography, or micro CT, offers insight into the inside of AM parts.
Read More3D Printing Brings Sustainability, Accessibility to Glass Manufacturing
Australian startup Maple Glass Printing has developed a process for extruding glass into artwork, lab implements and architectural elements. Along the way, the company has also found more efficient ways of recycling this material.
Read More
.jpg;width=70;height=70;mode=crop)
