


Before starting his own company, Richard Savage had 15 years of experience working in several injection molding facilities. “At all of them, I was frustrated by the lack of good, easy-to-use automation,” he says. Specifically, he was frustrated with end of arm tooling (EOAT), the component of an automation system that interacts with the workpiece. In injection molding, this is typically a vacuum gripper or gripper fingers that remove parts from a mold. Savage says that the EOAT would often miss parts, and he would have to realign it so that it would pick up the parts again. And if it missed a part and the mold closed with the part still inside, the mold could get damaged. “I spent so much time pulling molds, putting molds back in and doing mold repair work because of this automation,” he explains. “And it was frustrating because we put in a solution to try and make us more productive, and it was taking more tech time and costing more money.”
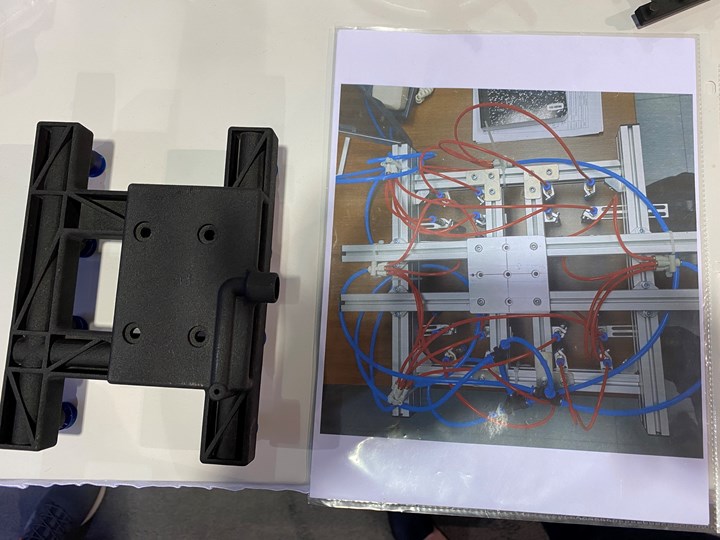
Traditional solutions for injection molding end of arm tooling (seen in the photo on the right) are manually assembled and adjusted from a kit, and when shops do use custom solutions, they’re subject to long lead times. 3D printed custom EOAT is lighter (as in the case of the segment on the left), easier to set up, and faster to obtain.
He was first introduced to 3D printing as a solution by a local representative from AM distributor and service provider PADT. “I was working on a mold at the time that hadn't had an end of arm built for it,” he recalls. “Nobody thought about it during the mold build and we needed one quickly, and I thought, ‘Well, why not? I'm sure we could 3D print something that would at least work temporarily.’” So he had PADT print a gripper on an FDM machine. “It didn't work great, but it worked,” he acknowledges.


Since then, he has gone on to successfully design many other 3D printed grippers, eventually leading him to start Savage Automation, which specializes in 3D printed EOAT. He says that the bulk of his customer base is in injection molding because of his background, but the company has taken on projects for other applications as well. Most of the company’s 3D printed EOAT uses vacuum or pneumatic gripping, and sometimes both (such as applications involving family molds with oddly shaped, oddly distanced parts).
Benefits
Savage says that he quickly began to see the benefits of 3D printing with his first EOAT. A technician set up the machine incorrectly, crashing the EOAT into the mold. Savage noted that although the EOAT was damaged, the mold itself was not. “Damage to the mold could take weeks and thousands of dollars to repair,” he explains, but he could 3D print another EOAT relatively quickly and inexpensively.
This short lead time is another major advantage. He says that with 3D printing, he can produce custom EOAT in two to eight weeks, where traditional methods can take as long as 20 weeks. 3D printing allows the company to be agile with design, and produce complex parts without adding lead time.
Savage notes that most of the EOAT injection molders use isn’t custom at all. The most common solution is a kit containing a piece of plate or extruded aluminum with holes to bolt on suction cups or grippers, which injection molders manually adjust for each application. “Those things get adjusted over and over and over,” he explains. “Eventually the threads start to wear out and the component doesn't hold on anymore. It's really common to see somebody go in with a zip tie and zip tie it in place to get through the production run.” With custom 3D printed EOAT, the features are fixed in place and don’t move over time, which means no maintenance or adjusting.
Custom 3D printed EOAT also speeds setups. Not only is there no need to adjust the suction cups or grippers, there’s no need to route the air lines required for vacuum and pneumatically actuated gripping. “We can print our air lines internally, so that there's just a single connection for vacuum and a single connection for pressure,” he says.
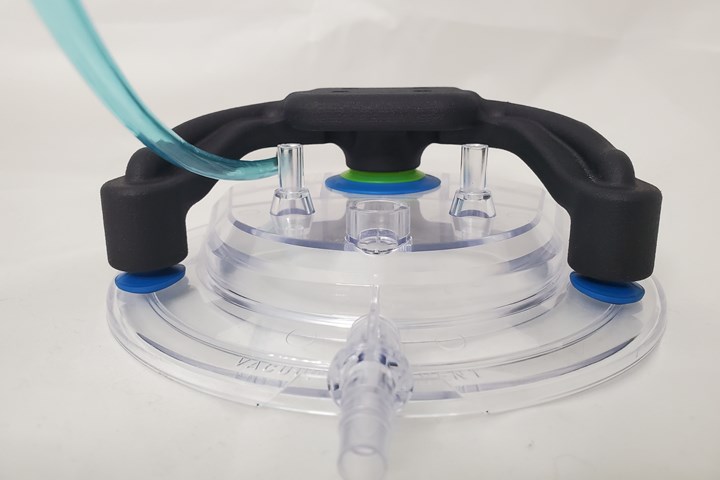
3D printed EOAT doesn’t need to be adjusted, and internally printed air lines provide a single connection for vacuum and a single connection for pressure instead of having to route external air lines.
Finally, 3D printed EOAT is lighter than traditional solutions. Savage says that in a one-to-one comparison, 3D-printed nylon 12 EOAT is 40% lighter than a traditional aluminum version, but when designed for 3D printing, weight could be reduced by as much as 60%. This is a huge advantage for customers who come across applications that are too heavy for their robot’s payload, or have to run their robot slowly to prevent vibrations. “But it also benefits customers that do have enough payload, because the lighter your end of arm, the less wear there's going to be on the servo motors of your robot, and you may be able to save time by moving faster,” he adds.
Design and Production
When designing 3D printed EOAT, Savage says he starts with CAD models of the mold and parts, “and we design backward from that.” First, he’ll design the grippers or suction cups, and then the body of the EOAT. One major factor he takes into consideration is how to route the air lines. Because they’re built into the gripper, there’s no opportunity to move them once they’re printed. He also has to ensure that the EOAT will be strong and solid, while ensuring that the wall thicknesses are even and won’t sink during printing.
The company has a Markforged Onyx One that it uses for prototyping EOAT. “Sometimes it's helpful for our designer to print them out on the Markforged and just see, how does this look? Where are the weak points? What could go wrong?” Savage explains.
The final EOAT are printed from nylon 12 on an HP Multi Jet Fusion (MJF) machine. Savage says that he eventually landed on this as his preferred process for EOAT. He learned from his first 3D printed EOAT that FDM isn’t sufficiently airtight for pneumatic and vacuum gripping mechanisms to function optimally. The air lines also frequently require support structures when using FDM, which can be difficult to remove. (A workaround involves designing teardrop- or diamond-shaped lines.) However, powder bed processes such as MJF do not require support structures to print internal channels of any shape, Savage says. MJF’s detailing agent produces nice-looking parts right off the printer, and aids in cleaning loose powder out of the internal channels, he adds. After printing, the EOAT is vapor smoothed and dyed black. Savage then assembles the components and ships the tool to the customer.
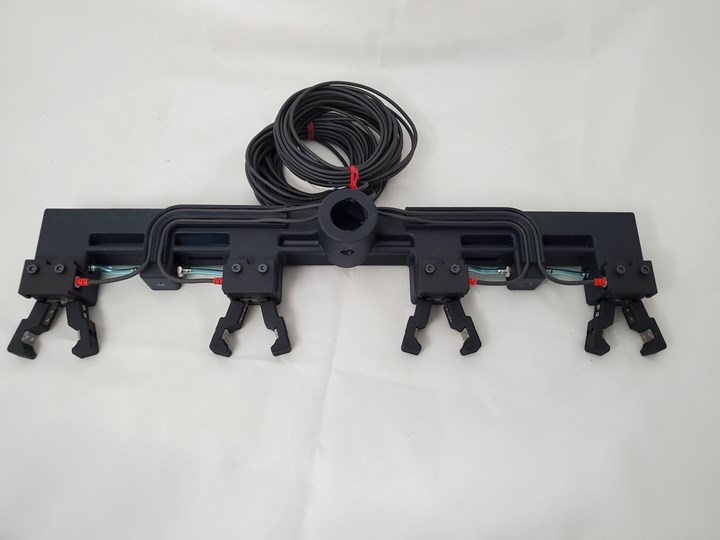
The final EOAT is printed from nylon 12 on an HP Multi Jet Fusion (MJF) machine. This process creates air and liquid tight parts, and can print internal air lines without the need for support structures.
All of Savage Automation’s EOAT are printed through a service bureau, Additive America. This allows the company to focus on design instead of operating a 3D printer. Additionally, the company is printing parts in relatively low volumes. Savage estimates that the company prints 5 to 10 parts per month, and they rarely, if ever, repeat parts. “For us, the ROI of owning the printer isn’t there,” he says.
Applications
Savage says that 3D printed EOAT is suitable across a range of part sizes. For larger applications, the grippers are printed in multiple pieces and attached to an aluminum backbone. The aluminum gives the tool extra rigidity, while the 3D printed components match the parts and use internal air lines. “It's kind of a hybrid solution that gives us the best of both worlds.” He adds that every EOAT he has designed includes at least some 3D printed components. “Even though you can't use 3D printing as a pure play for every situation, it is useful in every end of arm we build,” he notes. Even with an aluminum backbone, there are some size limitations — he says that while 3D printed EOAT can work well for large parts, like plastic totes, it might struggle with “huge parts,” such as a vehicle bumper.
“I would say where you really get the biggest bang for your buck is difficult applications, when you have something that's difficult to pick, where you can't just put a suction cup on it and pull it out, or you have angles, or you need to separate your parts,” Savage says. “All of those things where you've got a tricky situation, that's where it really shines.” One example that’s common in injection molding and other packaging applications is the need to pick up multiple items at one pitch spacing, and then place them at a different pitch spacing. “We developed a 3d printed solution that uses the geometry of the printed portions along with a cylinder and some springs to automatically adjust that pitch spacing. We did it with very few moving parts and it was lightweight,” he says. “There's not another good way to do that. It's something that would really be impossible with traditional manufacturing methods.”


Related Content

10 Important Developments in Additive Manufacturing Seen at Formnext 2022 (Includes Video)
The leading trade show dedicated to the advance of industrial 3D printing returned to the scale and energy not seen since before the pandemic. More ceramics, fewer supports structures and finding opportunities in wavelengths — these are just some of the AM advances notable at the show this year.
Read More
How AM Enables Cobot Automation for Thyssenkrupp Bilstein (Includes Video)
The shock absorber maker has responded to its staffing shortages through extensive use of collaborative robots. In-house 3D printing makes this possible by providing the related hardware needed to complete the cobot-automated cells.
Read More
Autonomous Cobot Automation Increases Production 3D Printer Output for Ford (Includes Video)
A mobile robot that travels to each Carbon machine to unload builds lets the automaker run an additional three to four builds per machine per day. Autonomous robots fit well with 3D printing, but their role in production will extend beyond just the additive machines.
Read More
Large-Format “Cold” 3D Printing With Polypropylene and Polyethylene
Israeli startup Largix has developed a production solution that can 3D print PP and PE without melting them. Its first test? Custom tanks for chemical storage.
Read MoreRead Next

AM 101: Multi Jet Fusion (MJF)
From functional prototypes to end-use parts, HP’s Multi Jet Fusion (MJF) is capable of efficient production. Learn about MJF, including its materials, postprocessing requirements, benefits and more, in this 101 post.
Read More
3 Types of 3D Printed Tooling for Injection Molding: AM Radio #16A
3D printed tooling for injection molding, including mold inserts, components and end of arm tooling, were on display at the Plastics Technology Expo.
Read More
How A Digital Manufacturing Workflow Is Making Orthoses, Prostheses More Accessible
Digitization of the workflow needed to create limb prostheses, orthoses, helmets and more means that these devices will become more readily available. Using 3D scanning and 3D printing, EastPoint Prosthetics and Orthotics and Additive America have established a way to produce these devices that both changes lives and makes business sense.
Read More