


In this episode of our “AM: Why the Failure?” video series, Penn State professor of additive manufacturing (AM) Tim Simpson and I discuss a piston crown made through laser powder bed fusion (LPBF). Because of the way solving one problem with this part’s build led to another problem that needed to be solved, the iterative path to success makes this application perhaps the most representative of process development in AM of any episode so far.
Guesses by audience members in social media (three different LinkedIn threads for different build attempts — phase one, phase two and phase three) rightly identified first the support structure design and then the overall design of the build layout itself as culprits in build failure. The latter point proved key: In LPBF, Simpson notes, the parts on the build plate affect all the other parts in the same build. Success ultimately involved changing what additional parts shared the build with the crown part intended. | This episode of AM: Why the Failure? brought to you by Verisurf
Related resources:
- Introduction to powder bed fusion
- Challenges of metal AM
- Metal AM successes and technology
- More episodes of AM: Why the Failure?
Transcript
Peter Zelinski
Welcome to “AM: Why The Failure?” This is our show about success in additive manufacturing, but the failure that we go through on the way to success. We talk about process development; we talk about build failures on the way to successful 3D printed parts. So let me introduce my co-host, our resident expert, Penn State additive manufacturing Professor Tim Simpson, hello, Tim.
Tim Simpson
Hey Pete, it is great to be here.
Peter Zelinski
We are going to do another laser powder bed fusion part this time. We have done powder bed fusion before, but this time, I think we have got maybe a more realistic example of process development, because with additive it is not just discovering one failure, one little problem fixing it and you are done. It is more of a sequential process. Does that sound right?
Tim Simpson
It does, unfortunately and it can be a very painful process. Sometimes the things you do to try and fix that failure could lead to new failures, or it moves you on and then you discover other challenges during your build as we did in this case.
Peter Zelinski
All right, as we did in this case. This is an example of that, fixes to one problem leading to another problem that in turn had to be fixed. Tim, give us an introduction, what is this part that I am holding? What is it made of? What purpose did it serve? Talk a little bit about this project.
Tim Simpson
This was an early project with an automotive manufacturer, they were looking at some novel piston crowns, other geometries, and in there and they wanted to speed up their prototyping and design iterations. Their current method of outsourcing prototypes and getting them back took too long. So, they work with us to say, they could we print a functional piston crown, for then testing and iteration on our design.
Peter Zelinski
You did not just print the complete crown, you printed some fractional sections too, right?
Tim Simpson
Absolutely right, I think one of the things when it is powder bed fusion is that you end up filling that whole build plate with powder there, and you then want to pack it with as much and as many parts or get as much information out of that build as you can. In this case, we had the full section of the piston crown, we had put some internal geometries there for conformal cooling and such, and we wanted to print quarter and a half sections of that so that we could see inside to be able to show and demonstrate to people the power of additive.
Peter Zelinski
Let us talk about the first build attempt. There were a series of attempts, and we are going to get into your first attempt, but talk about what you tried, what you encountered there, and what this photo is showing.
Tim Simpson
Absolutely, this is not what you want to see when you look in to check on how your build is doing, you want a very nice, smooth, flat uniform surface from powder that has been recoated. In this case, you see all sorts of bumps, grooves, and divots in there, something is going on, you are not getting good powder spread, you are probably encountering some geometry. Nonetheless, you have got to stop the build and figure out what is going on.
Peter Zelinski
Alright, so as we do when we have these parts that we are going to talk about we debut the failures on LinkedIn first, watch for the hashtag #AMWTF and we invited respondents on LinkedIn, experts on additive manufacturing that we found there, and on social media to comment on what they were seeing. What is the cause there, and Tim, I think John Lomer and Jacob Steinberg had interesting comments.
Tim Simpson
Yeah, I think they were some of the first to respond. John was from Oerlikon, the powder manufacturer there for additive manufacturing and thought about contaminated powder, chemical levels are off, or something along those lines that then could lead to sort of an inconsistent melt, heat dispersion, those sorts of things, and I think certainly would be something to consider. If it were sort of contamination, it would certainly be a bit more random I believe within the powder bed there, versus in a particular area, versus here, you can certainly see streaks and lines that led us to think not probably something going on with the geometry underneath. So Jacob Steinberger, I think was one of the first to hit on the process in geometry picked up on you know, likely this is a hardware recoater blade there and one of the big things with laser powder bed fusion, heating, cooling, things can curl up like a potato chip and then recoater blade comes along and smacks it or hits it and that you could certainly stop it. He also noticed similar spots on either side, and maybe there was a circle or tangents to a circle underneath, and that was true again, a piston crown here, so you are turning, printing a circular cross section, and building up those walls there. So picked up on that and diagnosed it correctly from the bumps and ridges that we are seeing in the powder layer there as well.
Peter Zelinski
Alright, so those answers got really close who got it right?
Tim Simpson
I think for this first one Kevin Cwiok from Keselowski Advanced Manufacturing got it closest: delamination caused by the large streaks, unfused layers that were going under underneath, and being swept or hit by the recoater blade that was then jamming on the next part within the build, and that certainly is what caused us to stop it.
Peter Zelinski
Again, this is the first thread, more threads in social media are coming, but as part of the comments on this one, Bob Markley was back, and he has made appearances in various previous episodes, and he made an interesting comment that kind of as an aside points to how young additive manufacturing is as a production process.
Tim Simpson
Yeah, I loved Bob's comments throughout the series that we were doing, but in this one calling out the need for a specification for failure terminology. I think that was something indirectly Pete that came out of this, as you said, as people have sort of different names, or referred to these failures in different ways, and there is not a standard set of terms or this type of failure, or that type of failure in powder bed fusion, let alone any of the other processes that are out there.
Peter Zelinski
So as Kevin Cwiok rightly identified, it was the support structures. So, Tim, what did you do and what happened next?
Tim Simpson
Well, the obvious thing is to get rid of the support structures. So here the skirt of the piston came up above the lowest layer, essentially it extended beyond that. So, we just dropped the skirt all the way down to the build plate to really anchor it there. It meant a longer print time and more material, but hopefully it would have avoided that failure.
Peter Zelinski
So, we opened a whole other thread then in LinkedIn under the same hashtag to talk about what we are seeing here. What happened next of the responses that started to come to this thread, were there any there who came close?
Tim Simpson
Yeah, Michael Cook from GKN Aerospace and Greg Paulson from Xometry immediately picked up on the problem here. Remove the powder in this image, and you can actually see the support structures here, some of which as Greg said, timber fell over the tree like structures, the diamond shapes that Michael Cook pointed out, those that were running sort of perpendicular to the recoater blade, essentially they were the 45 degree angle that was underneath those was not enough to resist the recoater blade as it pushed the next set of powder over the next layer of powder there and knock those off in that particular direction versus those that had a wider interface to it, wider exposure to it, were stiffer with the direction of recoater travel. Both had picked up on that and even suggested perhaps instead of a hard recoater blade, perhaps moving to a softer coater blade.
Peter Zelinski
We are getting very close, Tim, one more photo, why do not you show us what we are seeing here.
Tim Simpson
In this case, we are showing our next failure. So, we had eliminated the support structure issue, but now as we were building up the geometry, we ran into a case where the overhang angle, which was on 45 degrees and should have been self-supporting, ended up colliding with the recoater blade. Both the quarter section and the half section, if you notice the difference in height, the quarter section hits sooner, so we had to stop, but were able to get a little bit further with the half section. Eventually that got damaged so much that we had to stop that build as well, and so here we were again, we corrected one problem, thought we were good with our overhangs being self-supporting, but in the end those caused the next series of failures here.
Peter Zelinski
In this case, it was these fractional parts that you created that were causing problems for you. You mentioned earlier how you have got a whole plate to fill a bed full of powder, and it is useful to put more parts on there that give you all the information you can, but in some sense you made it harder on yourself by doing that. I think under this discussion thread Ryan Kircher and Stefano Scaramuzza
picked up on that.
Tim Simpson
They did. In fact, they noticed that again, but now with some of the angles and the orientation with respect to the recoater blade here, delamination around the edges as things get hot heating and cooling. What ends up happening here is even though you are on a 45-degree angle, sort of a thick to thin transition does not necessarily allow you to ascend. A thick transition surprisingly did not allow you to dissipate heat quickly enough and, you started to get some deflection there. It was even worse in the corner section so Stephano referred to it as the thermal ballasts essentially having a little less volume there to help dissipate the heat, and provide in this case, some extra rigidity to the structure to withstand contact with the recoater, the quarter and the half sections, neither of them were able to do that versus the full section, and again being a complete circle in this case, was able to avoid that failure.
Peter Zelinski
So, they were talking about the recoater blade which is the blade that sweeps across the powder bed to get the powder layer flat for building each successive layer of the part, was the recoater blade the answer?
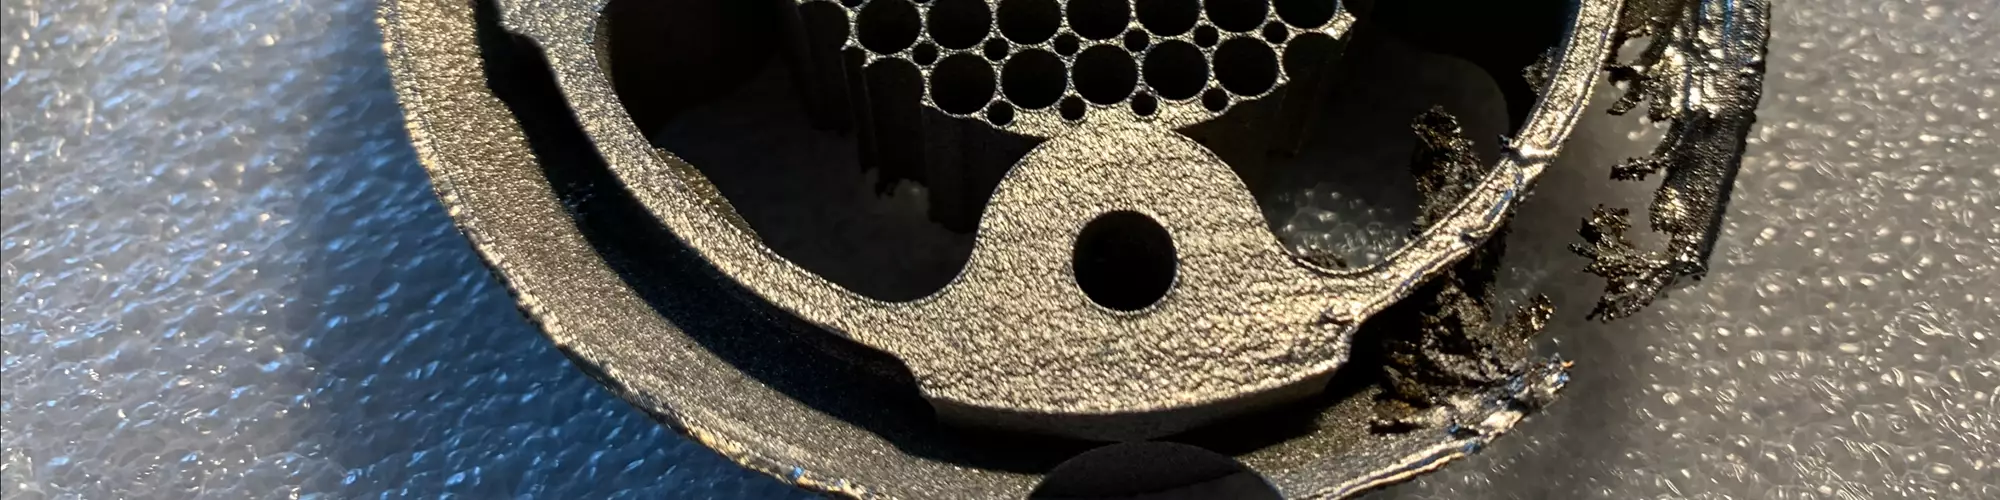
Tim Simpson
Well, we thought about that, so we switched out to use a carbon fiber brush instead of the hardware coater blade you can see there, and the next set of images, the metal deflected enough so that it now sort of cuts the bristles out of that brush, which then creates an uneven spread that lends to the flakes, or the little tendrils that you see sort of growing off the metal. So just swapping out the recoater blade did not help.
Peter Zelinski
So, what were the final steps? How did you get this part to build successfully?
Tim Simpson
Well, we certainly scratched our heads a lot on this one. We have the initial piston crown that we had built for them and had no failures with multiple prints. We went back and looked at the cascade of failures that was going on here, and one of the things that we realized was very similar to what Ryan Kircher had suggested. It turns out that it was either the quarter or the half sections, those were the ones that were always failing. In the end, we swapped back to the hardware coater, we eliminated those extra sections from the build, and printed out the one piston crown, the full round circumference and everything, and that worked just fine. Once we had made that change to the support structures.
Peter Zelinski
Removing these fractional pieces is what really helped you and again you made it harder on yourself when you decided to include those challenging parts in the build. Maybe the larger takeaway there is, you are not just building a part, it is all the parts in the build affecting all the other parts in the build, and that has got to be part of your thinking to.
Tim Simpson
Absolutely, we talked about how your natural tendency is try and pack the build plate as fully dense as you can, and use as much of that powder, but to your point, you do need to also think about what if this part build fails? Or what if this does over here, what is upstream, what is downstream, what is connected to them, it is going to change layer pass times, and all that sort of stuff as between that. So, it is not, there is no easy solution when it comes to trying to move these parts into production, with additive manufacturing.
Peter Zelinski
I guess we leave it there, successful build, it took a little while to get there, and members of our audience pretty much knew the right steps to take and the right choices to make to get us to success. Tim, thank you for sharing this part with us. Thank you for sharing all these parts we have gotten to talk about on this show and all the lessons you have learned.
Tim Simpson
Excellent. Hey, it has been great to be here and I think in the end even with this final example, the reason of using additive for functional prototyping, despite the missteps there, we were still able to compress the two months or so lead time that they had down to half of that and of course, once we figured out what to do, it could easily turn around new designs in one to two weeks which allowed them to speed up their prototype and development phases as they had hoped. So, in the end, it was a success.
Peter Zelinski
All right, thank you for watching this video series. We are going to take a little break now; we are going to go fail some more, but this idea of looking at failure, sharing failure, has been well received. I think we are going to do more of these so stay tuned. Keep watching that #AMWTF hashtag. See you soon.
Related Content

DMG MORI: Build Plate “Pucks” Cut Postprocessing Time by 80%
For spinal implants and other small 3D printed parts made through laser powder bed fusion, separate clampable units resting within the build plate provide for easy transfer to a CNC lathe.
Read More
Top 10 Additive Manufacturing Stories of 2023
Laser powder bed fusion, proprietary AM processes, machining and more made our list of top 10 articles and videos by pageviews this year.
Read More
8 Cool Parts From Formnext 2023: The Cool Parts Show #65
New additive manufacturing technologies on display at Formnext were in many cases producing notable end-use components. Here are some of the coolest parts we found at this year’s show.
Read More
New Zeda Additive Manufacturing Factory in Ohio Will Serve Medical, Military and Aerospace Production
Site providing laser powder bed fusion as well as machining and other postprocessing will open in late 2023, and will employ over 100. Chief technology officer Greg Morris sees economic and personnel advantages of serving different markets from a single AM facility.
Read MoreRead Next

Metal 3D Printed Part Should Be Flat, Has Bubble — AM: Why the Failure? #1
What should have been a straightforward application of laser powder bed fusion to make a simple component in 316L stainless steel turned into a printing fail. See why the failure happened.
Read More
The Harsh Realities of Additive Manufacturing
Now is the time to start talking about what is really holding back additive manufacturing.
Read More
What is Powder Bed Fusion 3D Printing?
Whether in metal or polymer, with a laser or an electron beam, powder bed fusion (PBF) is one of the most widely used 3D printing techniques.
Read More