
6 Things I Learned about Metal 3D Printing at the AMIST
I sat in on one and a half days of a five-day class offered at the Additive Manufacturing Institute of Science and Technology (AMIST) in Louisville. Here’s just some of what I learned.
.jpg;width=70;height=70;mode=crop;format=webp)


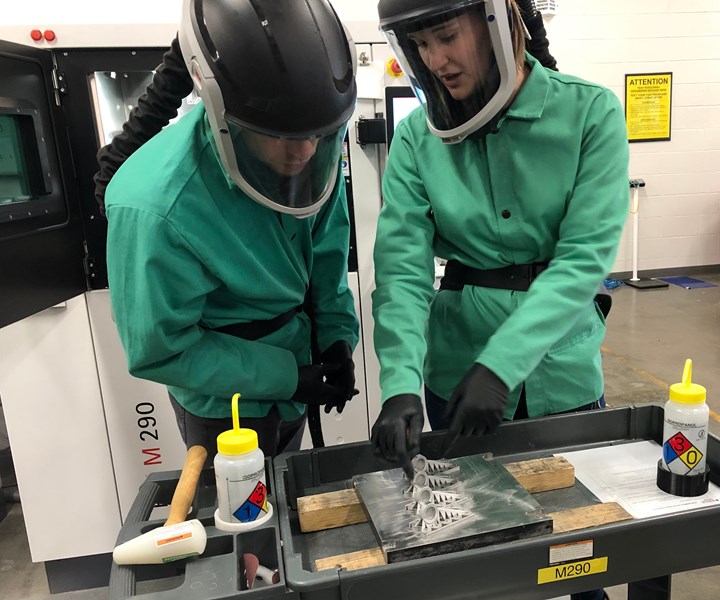
Graduate student Kate Schneidau instructs a participant at the AMIST in removing the powder from these parts. Class attendees come from various backgrounds at companies using or looking to implement metal 3D printing.
Getting into metal 3D printing is a major investment. There is the monetary expense of the machine and materials, of course, but also infrastructure to consider, as well as a clear plan for how the capacity will be used. But on top of all this, would-be additive manufacturers need trained personnel to run this equipment.
That’s where the Additive Manufacturing Institute of Science and Technology (AMIST) comes in. Formerly known as the Additive Manufacturing Competency Center (AMCC), the institute is part of the University of Louisville’s extensive AM capabilities, with more than 60 professionals and academics involved in additive manufacturing across research, engineering, dentistry and medicine. The facility is part service bureau, part R&D lab, and above all else, a training center. Led by Ed Tackett, director of educational programs for additive manufacturing, the AMIST provides training not just to the handful of UofL co-ops who work there, but also to professionals looking for education in additive manufacturing (AM). Workshops in design for AM (DFAM), metals safety and more are available, as well as custom options.


Who attends these classes? Primarily the people who will be running this equipment, as well as managers responsible for bringing AM into their organizations. And, occasionally, journalists who cover 3D printing like me. In early September, I had the opportunity to sit in on the beginning of the AMIST’s AM metals production course. Even though I’ve been writing about this technology for nearly 5 years, most of my conversations have been about interesting parts and applications, not the nitty-gritty reality of working with these machines. In just one and a half days, I learned quite a bit about owning and operating a direct metal laser sintering (DMLS) printer. I’ve summarized some of what I learned in the points below.
(Interested in a class or private training? Find the course schedule and contact info here.)
1. Safety comes from people and procedures, not PPE.
If the name Ed Tackett sounds familiar, it might be because he’s been a vocal advocate for metal AM safety in recent years. Therefore it was no surprise that a significant portion of this metal 3D printing class focuses on safety, covering facility requirements, machine considerations and operator protection. Tackett’s advice to companies starting out in metal AM is to buy the best possible personal protective equipment (PPE) for operators. Why? Because in addition to the fire risk posed by powdered metal and condensate, these fine particles are also hazardous when inhaled, absorbed, ingested or injected into the human body. Recommended operator gear includes puncture-resistant disposable gloves, battery-powered respirators, grounded footwear and fire-resistant clothing.
But PPE isn’t the best or even first line of defense an operator has against potential risks. “It creates a barrier between the hazard and the route of entry, but it doesn’t eliminate the hazard,” Tackett says. Having proper procedures, equipment and maintenance programs in place can prevent many potential problems. Manufacturers should monitor air quality, post hazard warnings and have ground rules for their 3D printing labs. Operators should be trained in those rules as well as fire safety and containment should something go awry. Users should also keep up with preventive maintenance schedules to avoid equipment failure that can result in metal powder, condensate or inert gas escaping the system.
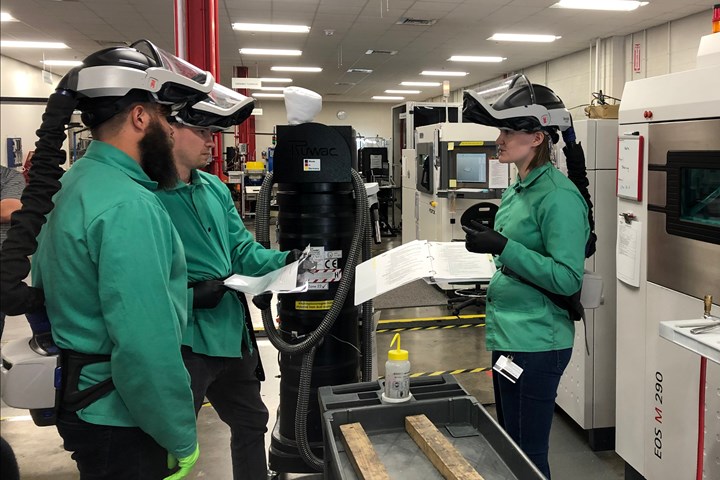
Students performing hands-on work during the course wear fire-resistant jackets, battery-operated respirators and pierce-resistant nitrile gloves. However, the most significant lesson in safety comes down to procedures. At the AMIST, every step of the process is documented and accounted for with checklists to ensure safety.
2. Postprocessing should influence support and part design.
This is a piece of wisdom that comes up frequently, but it sank in differently when I saw it in action. While setting up a part to run the facility’s EOS M290, one of the first steps Tackett took in Materialise’s Magics software was to raise the part 3.5 mm off the build platform. Why? “3.5 mm is the kerf on our band saw,” he explained. If the cut-off process had been wire EDM instead, the part could have been printed closer to the build plate. Knowing exactly the method for part cut-off ensures that a build can be set up with adequate space to allow for this process, while not wasting material or adding unnecessary print time.
Taking a step back even further, designers of metal 3D printed parts should also consider any possible machining or inspection that may happen to a part afterward. For instance, perhaps the part can be printed with flat surfaces or tabs to enable a machinist to more easily fixture it for finishing. The design could also include a datum to ease inspection, especially if the geometry is particularly organic. Postprocessing has to be a consideration from the very beginning, because “when that platform comes out of the printer, it’s metalworking,” Tackett says.
3. Total cost of ownership includes more than you think.
Owning and operating metal 3D printers can be costly, but the cost is not just in the machines and material. Some additional expenses include infrastructure such as a separate HVAC system for the 3D printing lab, a wet separator for used powder, and equipment for any postprocessing that might be performed in-house. But there are also recurring costs that may not be obvious, such as filters and PPE. In addition, the waste material from a 3D printer such as condensate and unused material must be disposed of properly.
Filters, for instance, must be changed after a set number of service hours or any time the printer changes materials. One printer might have multiple filters that can cost several thousand dollars to replace. In addition, the old filters must be passivated and disposed of as hazardous waste, another expense. Manufacturers can reduce the frequency of filter expenditures by batching work by material, or dedicating machines to specific materials.

Operator time is another expense that may be difficult to anticipate in advance. Cleaning out the printer’s build envelope (which at the AMIST is performed both before and after each build), for instance, is a step that takes time to perform correctly.
4. You can’t have it all.
3D printers can manufacture relatively quickly, and they’re getting faster. They can produce metal parts that exceed the density of castings. They can even create passable surface finishes for the right applications. But they can’t do all of this simultaneously. “Between speed, density and surface finish, you can choose two,” Tackett says.
“Between speed, density and surface finish, you can choose two.”
Consider a part that must be made 98% dense. A metal 3D printer can easily achieve this density by reducing the hatch distance (also called scan spacing) and increasing laser power, but the print will be slower. Time has to be sacrificed to get the density required, which will likely lead to better surface finish as a side effect.
As another example, a part could be printed quickly by defocusing the laser beam to increase the size of the melt pool and therefore the hatch distance. The build will be completed faster because the laser is making fewer passes, but fine details may be lost. (However, see Point #2—if the part is destined for finish machining, it could be designed to print slightly larger than needed so that those details can be milled in later.)
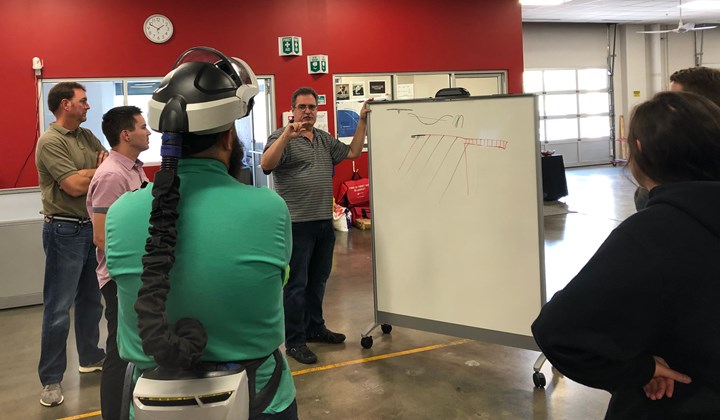
Ed Tackett describes how changing laser focus and scan strategies can influence the speed, density and surface finish of a metal AM print to a group of class participants and UofL co-ops. Every print involves a trade-off between these three, he says.
5. Get to know your 3D printer.
A commonly repeated design rule in 3D printing is that overhangs should be no less than 45 degrees from the build plate, but less than this is actually possible. Likewise, another rule of thumb is the 8:1 aspect ratio, meaning that build height should be no more than eight times the section width at the build plate. But in tests performed at the AMIST, ratios between 40:1 and 50:1 have been achieved. Getting beyond these design rules primarily comes down to knowing your printer, Tackett says. By understanding and manipulating scan patterns, offsets and more, it's possible to achieve features that conventional wisdom wouldn’t deem possible, in addition to simply printing more reliably.
In a bed that recoats from right to left, the best parts are likely to be made nearer the right side.
One thing Tackett recommends is benchmarking to find out the best places to print within the build envelope. In a bed that recoats from right to left, for instance, the best parts are likely to be made nearer the right side. The farther away from the powder reservoir they are, the greater the chance that the recoat could be short of material and leave porosity or other defects in the parts. The left side of the print bed, however, might be a great place to print prototypes or risky parts; if one fails and lifts off its supports, the recoater won’t drag it into other parts. Other factors such as laminar gas flow can affect build location as well.
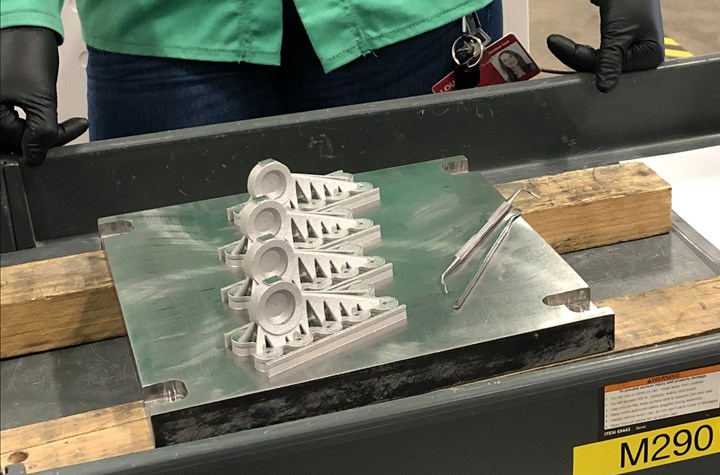
Understanding the characteristics of a given printer helps with part positioning as well. These brackets are staggered in a row that runs parallel to the recoater blade, so that a failure in one will not necessarily lead to damage of another.
6. As advanced as they are, 3D printers are still “stupid.”
Despite being capable of making complex fuel nozzles, topology optimized implants and lightweight brackets, metal 3D printers are not foolproof. Selecting a material, for instance, is one of the first choices a designer must make about a part, and print parameters are built around this selection. But the printer itself has no way of knowing whether the operator loaded the specified alloy into its reservoir or some other material. It cannot confirm whether it is pumping the proper inert gas into its build chamber for this particular powder. It does not know whether the build plate is made from a compatible material for this alloy. It might not even stop its own laser from melting powder onto the bolts of that build plate.
“We have to learn to use the technology the way it is.”
That isn’t to say that metal 3D printers are ineffective, just that there are still many places where metal 3D printing requires a trained human touch. And that’s the whole premise of the courses taught at the AMIST: teaching humans how to work safely and effectively (as well as creatively) with these machines.
The technology will improve, and things will get easier, but at any stage in AM’s trajectory, “We have to learn to use the technology the way it is,” Tackett says.


Related Content

10 Important Developments in Additive Manufacturing Seen at Formnext 2022 (Includes Video)
The leading trade show dedicated to the advance of industrial 3D printing returned to the scale and energy not seen since before the pandemic. More ceramics, fewer supports structures and finding opportunities in wavelengths — these are just some of the AM advances notable at the show this year.
Read More
AM 101: What is Ultrasonic Additive Manufacturing?
Going from additive to subtractive can be simple with Ultrasonic Additive Manufacturing (UAM). What is it and how does it work? Learn the basics in this 101 post.
Read More
How to Build 10,000+ Shot Molds in Hours
Rapid tooling isn’t so rapid when it takes days to 3D print a metal mold, and then you still must machine it to reach the necessary tolerances. With Nexa3D’s polymer process you can print a mold in hours that is prototype or production ready and can last for more than 10,000 shots.
Read More
AM 101: What Is Binder Jetting? (Includes Video)
Binder jetting requires no support structures, is accurate and repeatable, and is said to eliminate dimensional distortion problems common in some high-heat 3D technologies. Here is a look at how binder jetting works and its benefits for additive manufacturing.
Read MoreRead Next

Inside the Penn State Additive Manufacturing Master’s Program, Part 1
PSU's engineering master's degree in additive manufacturing and design offers students and manufacturing professionals a higher education in a continuously maturing field.
Read More
Installing a Metal 3D Printer Series
A five-part series documents one manufacturer’s experience and lessons learned while installing a powder-bed fusion metal 3D printer.
Read More
Safety Hazards in Additive Manufacturing
The number-one thing a company can do to protect its AM investment and not interrupt production is develop a comprehensive safety policy specifically for additive.
Read More