


Share


Rob Glenn’s career in product design and engineering has given him experience in using different types of 3D printing for prototyping. He translated this experience into his new business, Maxwell June, which uses 3D printing for production.
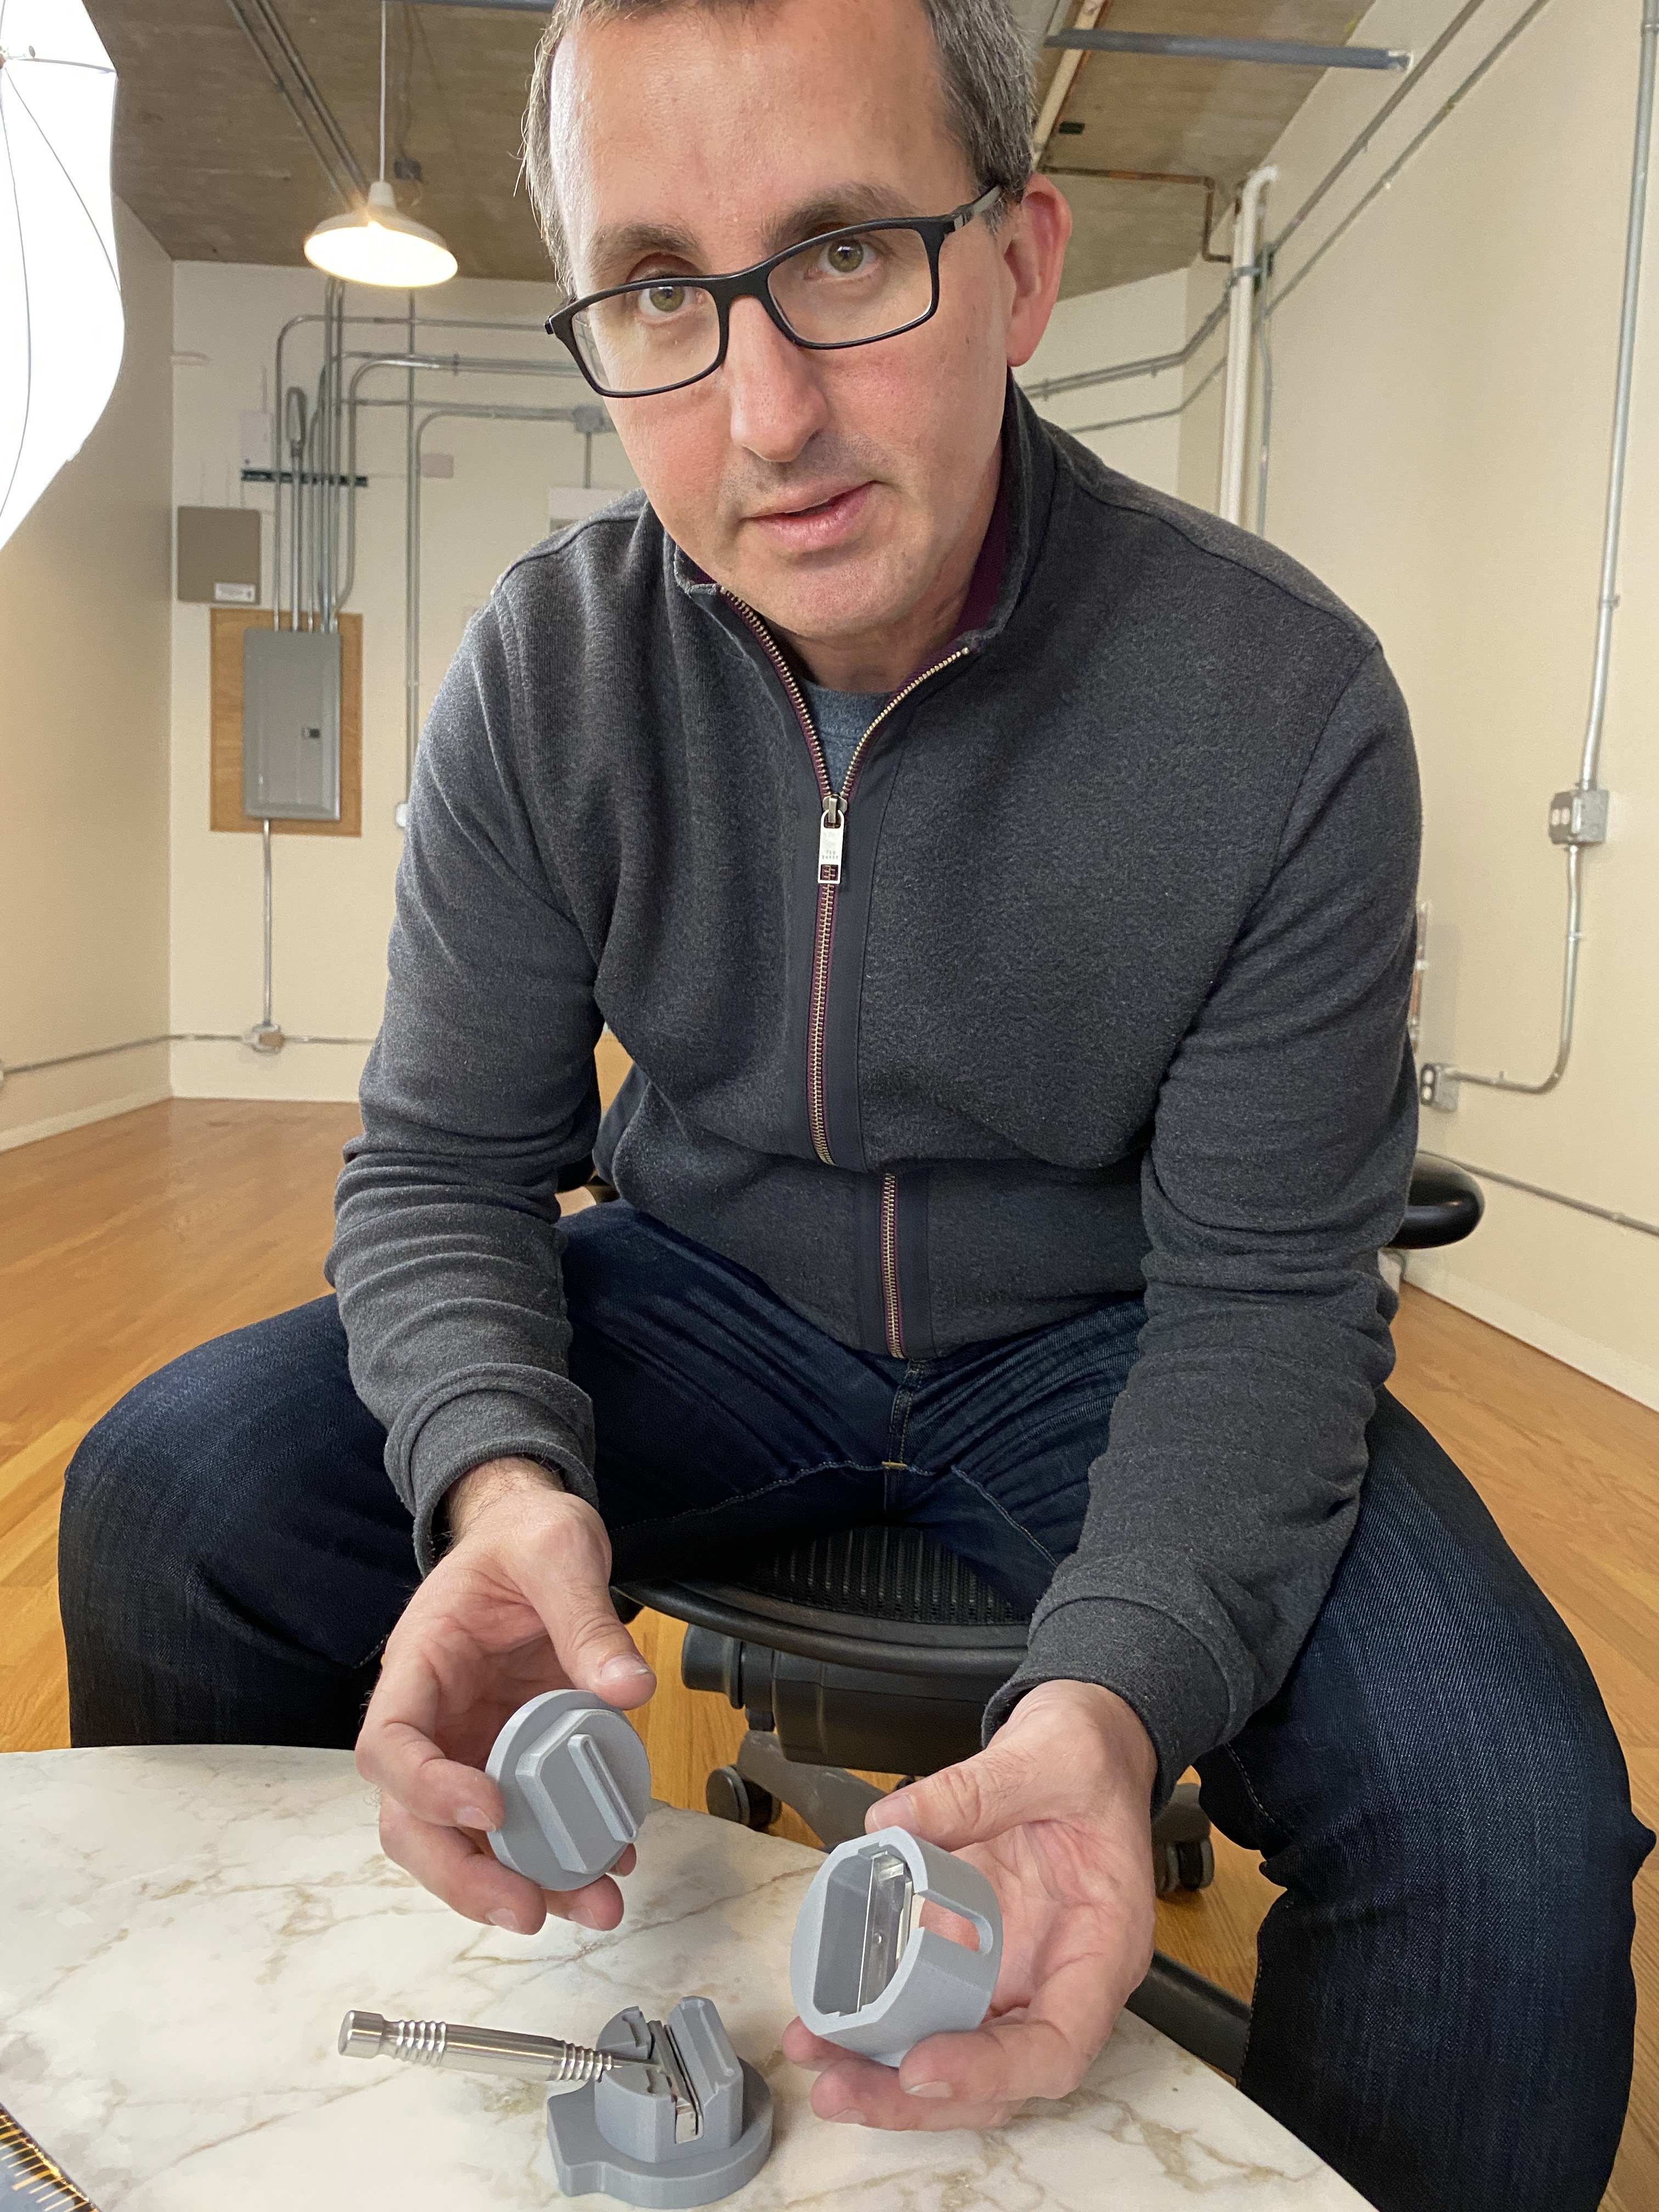
Robert Glenn has extensive experience with additive manufacturing — with his background in product design and engineering, he has been using various types of 3D printing to produce prototypes and models for nearly 30 years. He now runs a product design and engineering firm in Chicago called Rute Design, where he continues to deploy 3D printing in these capacities. The company has seven 3D printers: a small Formlabs SLA, a Makerbot Replicator, an Ultimaker 2+ and 2+ Connect, and four Ender 3 V2s. Work that cannot be done in-house is sent to local service bureaus. However, Rob (he prefers to go by his first name) also has another business, Maxwell June, that uses some of his FDM printers for production.
The shaving product his company makes is his first experience of FDM for this purpose. The production processes he has developed with this capacity not only work at current production levels, he says, but are scalable “up to a volume that might surprise you.”


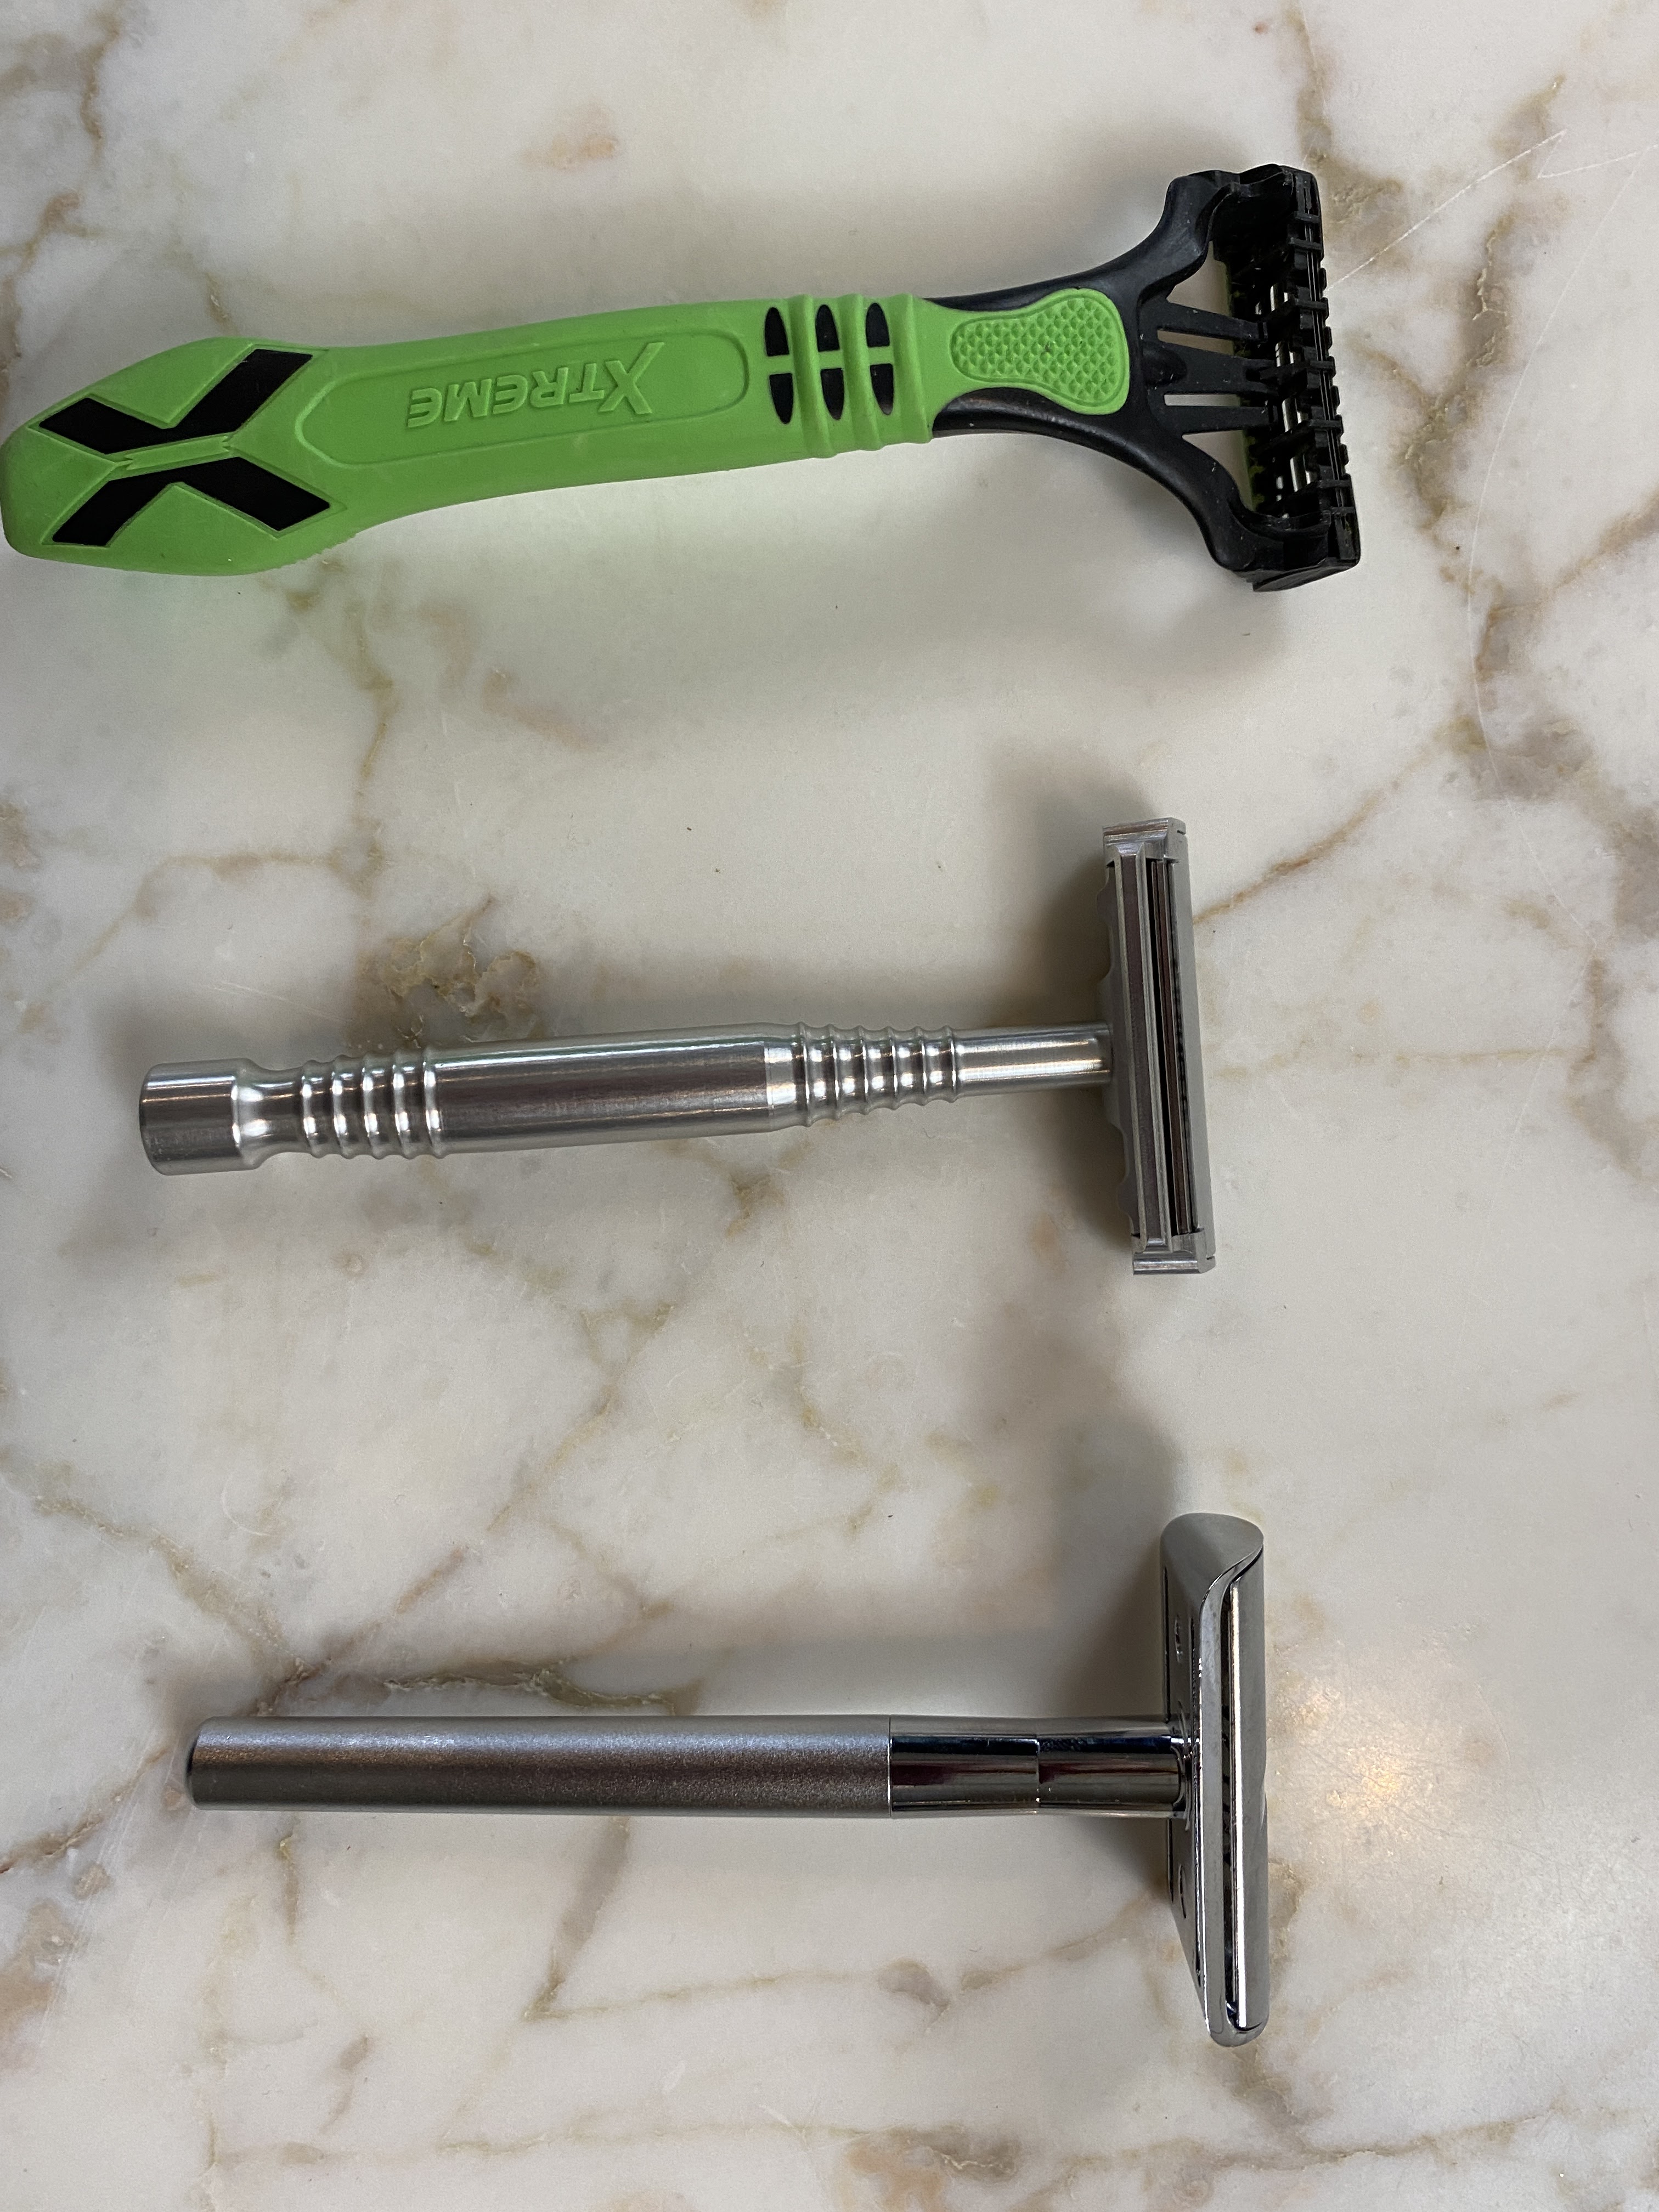
Maxwell June makes a razor (middle) and press system that’s designed to give users the ease of use of a disposable razor (top), with the cost and environmental benefits of a wet shaving system (bottom).
Cutting It Close
When it comes to shaving, people have three main options: disposable razors, cartridge razors, or so-called “wet shaving” systems that typically consist of a reusable safety razor and a double edge (DE) blade. Disposable razors are one-piece plastic razors with non-removable heads, and cartridge razors have a reusable handle with a disposable head that can be changed. These razors are designed to be easy to use — they have features such as enclosed edges, multiple blades and pivoting heads that make shaving easier and cutting oneself more difficult. However, they’re expensive, and they’re mostly made of plastic, which eventually ends up in a landfill. Wet shaving systems have a reusable handle, but instead of changing out the whole razor head like in a cartridge system, only the metal blade is replaced. A wet shaving system is cheaper over time (the razor itself may be more expensive upfront, but double-edge, or DE, replacement blades cost much less than razor blade cartridges), more environmentally friendly and can provide a high-quality shave. But these razors require a specific technique that can be difficult to learn.
Rob says that he hated spending so much on disposable razor cartridges, and hated throwing them away, but he struggled to figure out the technique for wet shaving systems. He wanted to develop a product that was in between the two options — something that provided the high-quality shave and environmental and cost benefits of a wet shaving system with a disposable razor’s ease of use.
He initially set out to make a 3D printed, open-source razor, but he quickly found that FDM couldn’t achieve the accuracy and level of detail needed to produce a razor that held the blade precisely enough to avoid cutting the user during shaving. This is when he acquired the SLA machine, which allowed him to successfully print a prototype razor that gave a good shave. But changing the blade on this razor was difficult. This inspired him to pivot to a razor made conventionally (through machining) with a design similar to wet shaving system, but with a 3D printed tool (made of PLA) that helps users load new blades.
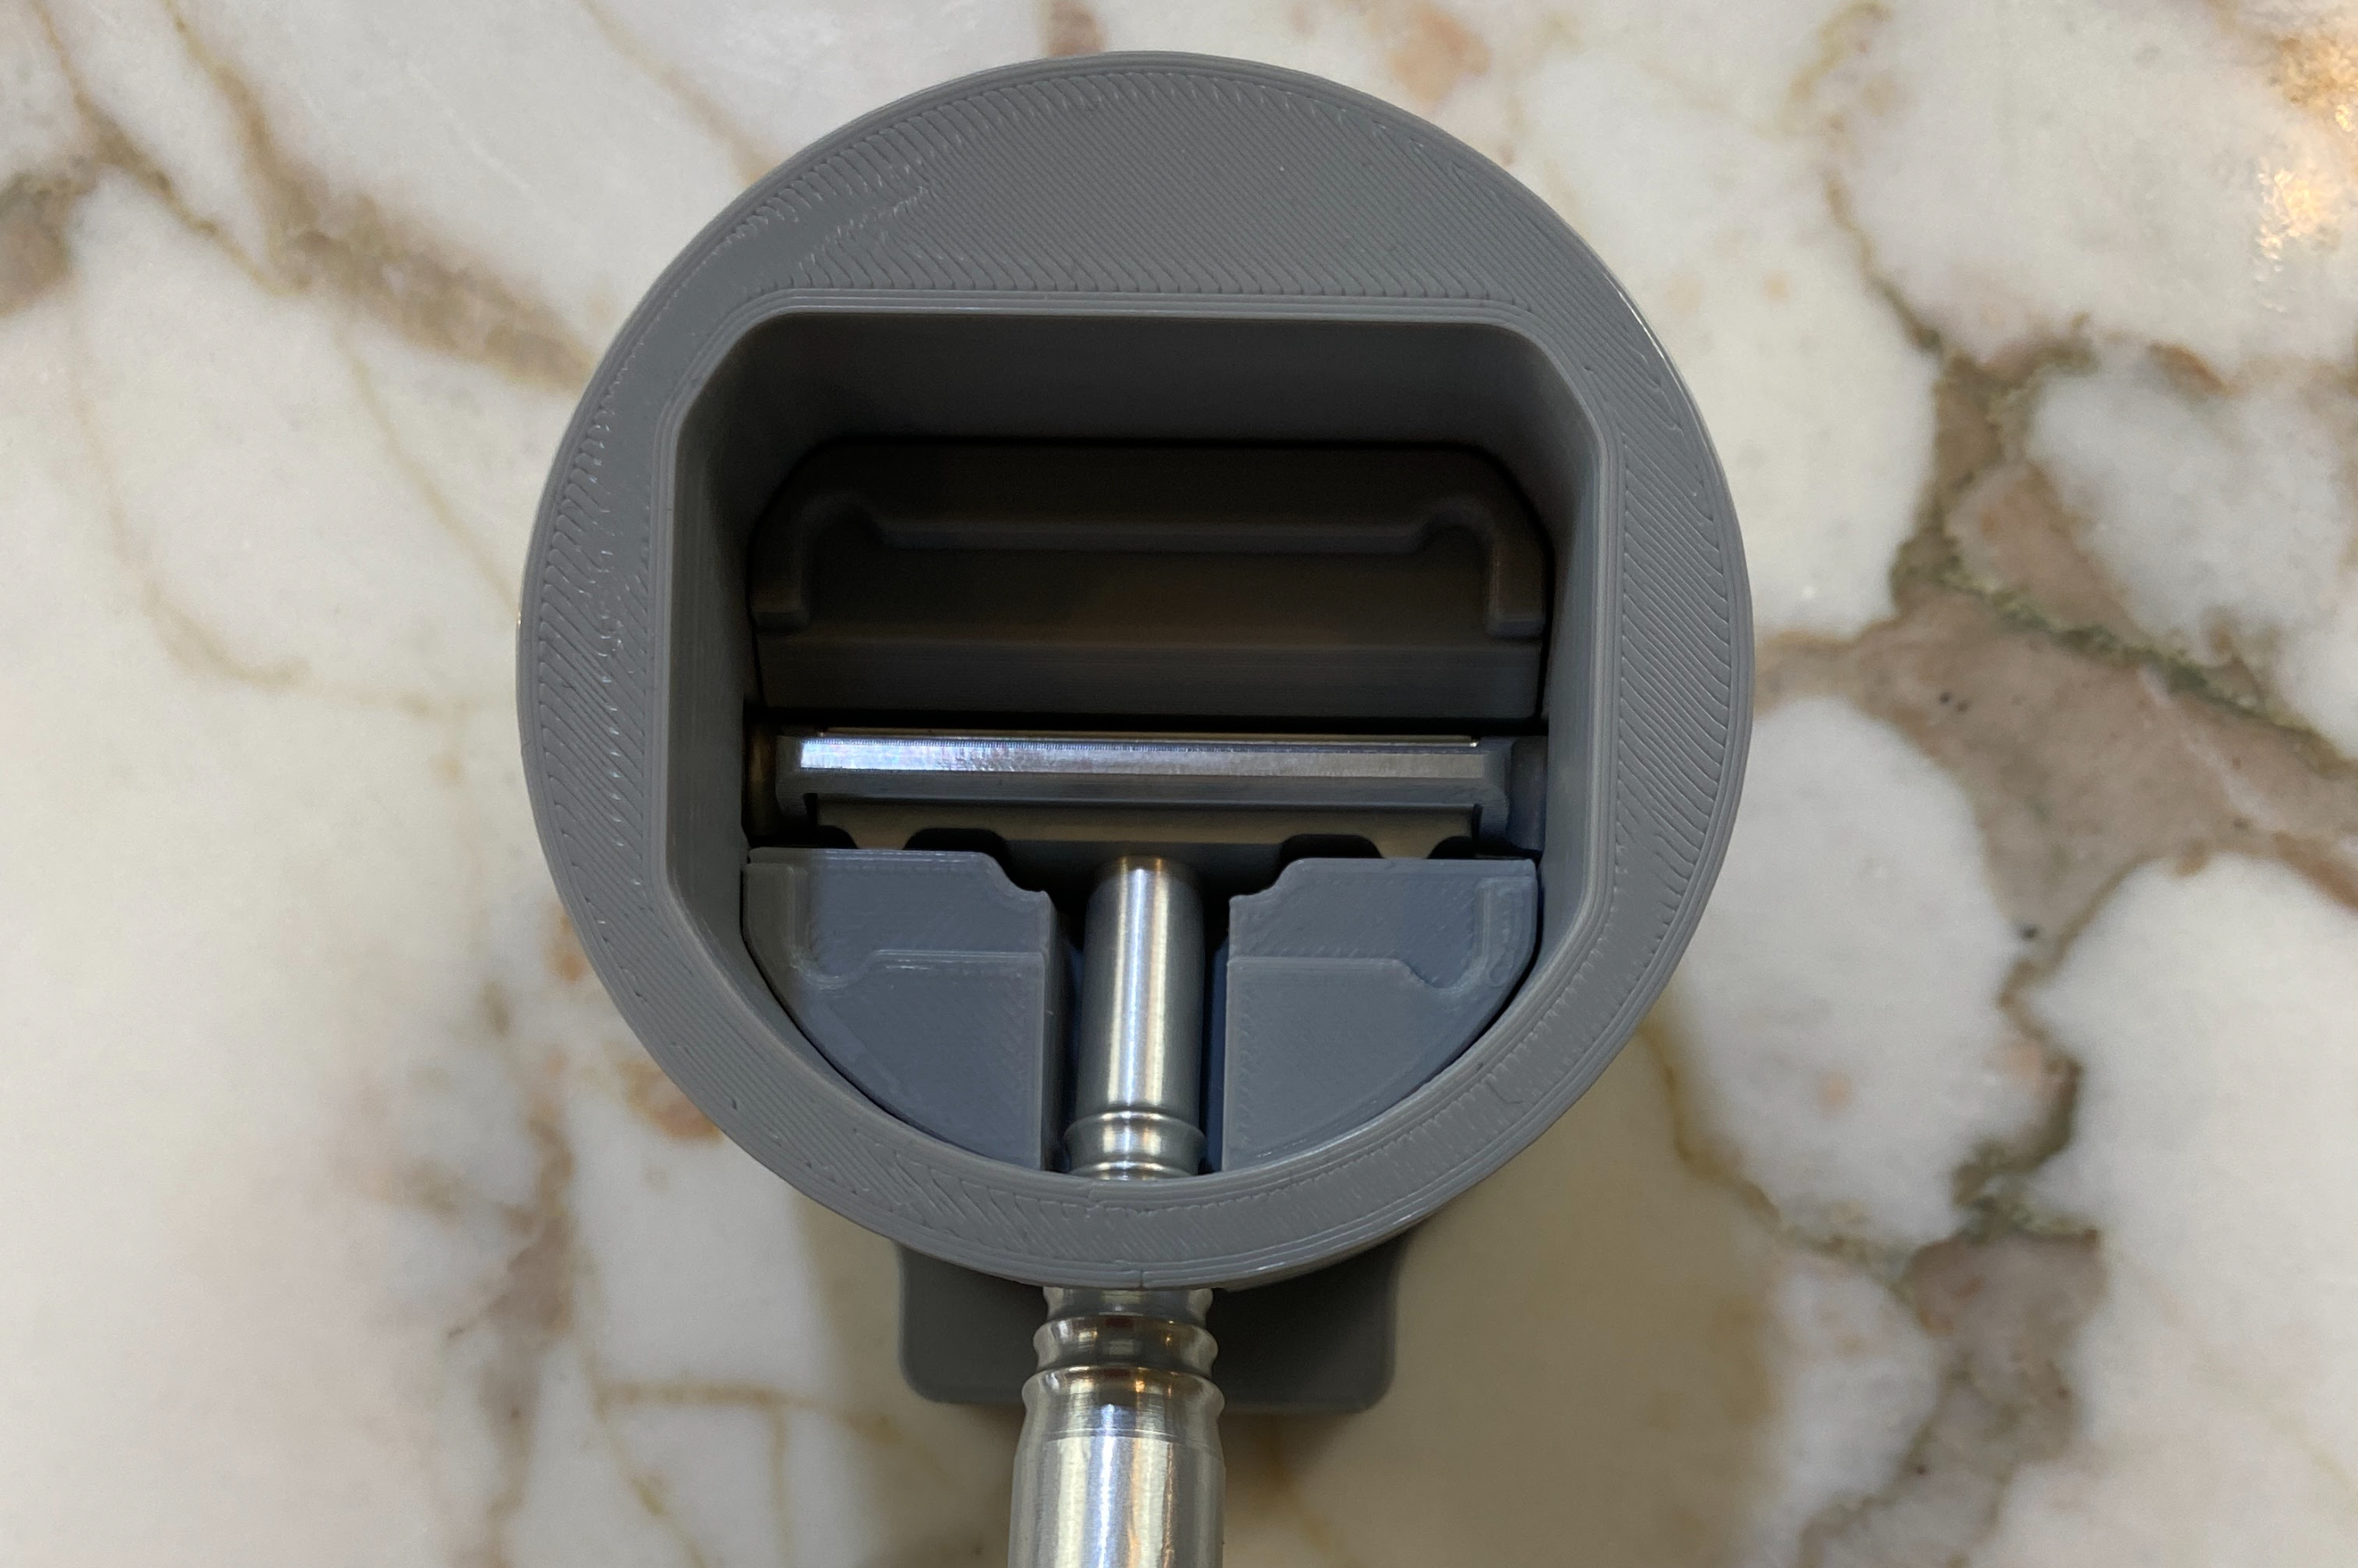
The 3D printed press automatically breaks a double-edge razor blade and puts it into the razor. This enables the system to give users a multi-blade shave with the ease of a cartridge razor for 10 to 20 cents per blade.
Rob knew that his design would have to work with a DE blade, which is essentially a commodity with a standard geometry that’s been around for more than 100 years. These blades have two sides, and typical wet shaving systems are single blade, using one edge at a time. When the edge wears out, users can flip it and get twice the use out of a single blade. Rob, inspired by trim presses and other sheet metal forming equipment, had the idea to bend or break a DE blade to create a double-bladed wet shaving system. He says that some products allow users to do this manually, but the Maxwell June press is designed to break the blade and load it into the razor automatically.
FDM For the Win
Producing this part via FDM might seem counterintuitive, he notes. It’s not customized, and it could be produced by injection molding or machining. But Rob knew that he didn’t want to go down the path of injection molding for several reasons. First, he wanted to make the product in America. Having mold tooling made in Asia wasn’t an option, but American-made injection mold tooling was too expensive.
One benefit of 3D printing the presses instead of using injection molding is that it helps Rob control inventory. He prints the presses in the office of his product design and engineering firm, where he keeps a small stock of inventory on hand.
Volume was another factor in the decision to use 3D printing. As a startup company, Maxwell June doesn’t need the volumes that injection molding provides. At this point, 3D printing allows Rob to control volumes and inventory better than injection molding. Because he 3D prints all of the presses at his design office, he doesn’t have room to store large amounts of inventory. The pace and scalability of 3D printing gives him flexibility when it comes to stocking parts. “We can do just-in-time or we can get ahead,” he says.
He also wanted the flexibility to make changes to the product. In fact, he says the company has made four or five changes to the product since it was launched (most of which are so small that customers wouldn’t notice). One of these changes was the result of a customer damaging the press by using too much force. Rob was able to move some features to make the press sturdier. “It effectively solved a problem we didn't see,” he says. “And the only way we could have seen it was when a customer [experienced] it.”
3D printing also has additional benefits over injection molding when it comes to the part’s performance and production costs. “The break reliability has a lot to do with everything lining up,” Rob explains. “All of these surfaces are zero draft, and that can be achieved in FDM.” While zero-draft surfaces can also be achieved in injection molding, it can be difficult and expensive.
FDM also keeps costs down when compared to machining. The company could machine the razor press (in fact, it’s testing machined metal presses), but the part’s complexity means that it would be more expensive.
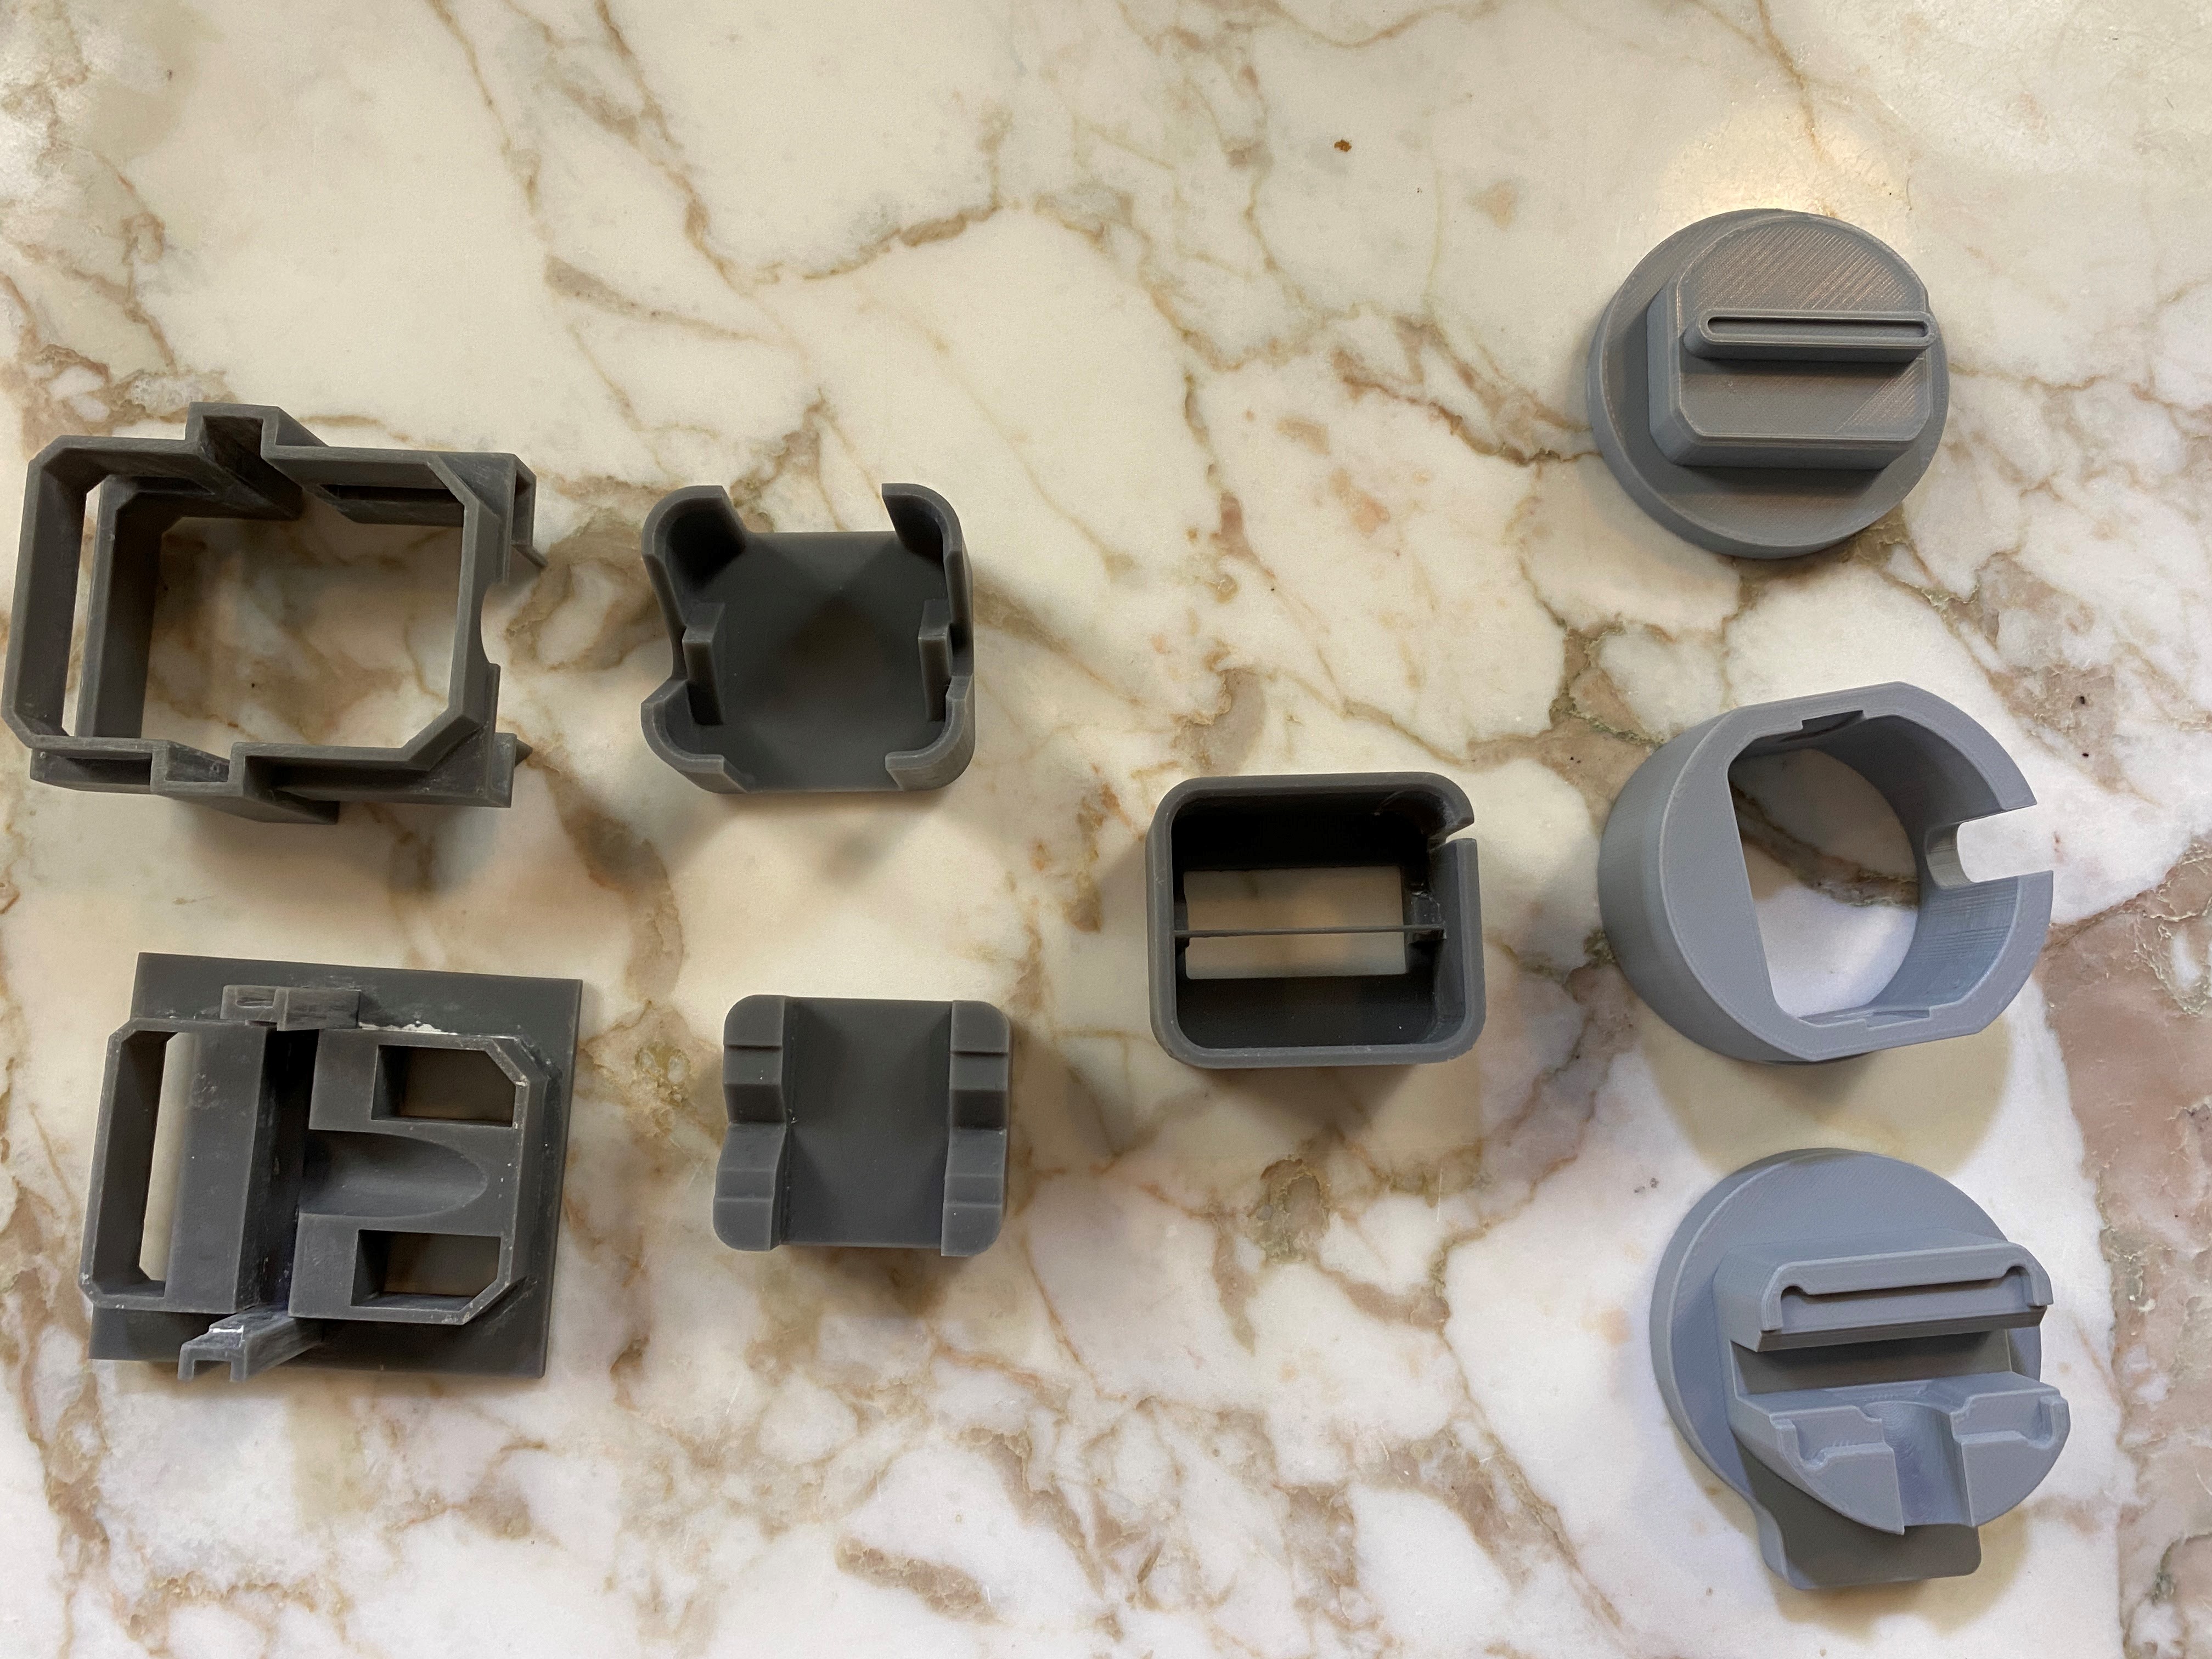
Rob says that one of the challenges of designing the press was figuring out the dynamics of how the blade was breaking. He was able to 3D print tools (left) that helped him isolate the position and movement that needed to happen inside the press (right).
Prototyping and Design
Before Rob could go into production, he had to design the press, and 3D printing proved invaluable at this stage too. He says he went through many design iterations. “When you break the blade, you can't actually see what's happening inside of there, and the dynamics of that motion are not easily simulated,” he explains. “It would have taken just as long to build the simulation as it was to just iterate it.” 3D printing not only enabled him to test out different iterations of the press, but he was also able to create “tools” to help him figure out the design. He described one device printed on the Formlabs machine that helped him isolate the position and movement that needed to happen inside the press.
Once he had the geometry of the press figured out, Rob optimized the design for FDM. One of the biggest considerations in the design was timing. Most importantly, the press was designed for zero postprocessing work. He says that in order to make 3D printing feasible, he has to spend as little time interfacing with the machine and parts as possible. Therefore, the design couldn’t have any overhangs or other features that require support structures. “If I had to pull a part off the machine and sand it and clean it somehow, we're toast,” he says. “It would be four times the price if we did that.” With the current design, he says that he spends around a minute and a half dealing with the parts between prints.
In addition to zero postprocessing, Rob designed with print time in mind. He wanted to be able to set up the machine before he left the office for the day, run it overnight and let it cool down before he flipped the machine the next morning. He chose shapes that could be printed with infill, which he adjusted to ensure the part was watertight but still within the required print time.
Because the part is made with FDM and doesn’t go through any postprocessing operations, he also had to ensure the design accounted for the layer lines left on the surface. These layer lines create friction when the user pushes down on the press, so Rob had to design enough looseness between the parts. “If you were to go a little tighter than this, it fights you enough that as you push it down, you won't get a reliable blade break,” he explains.
Production
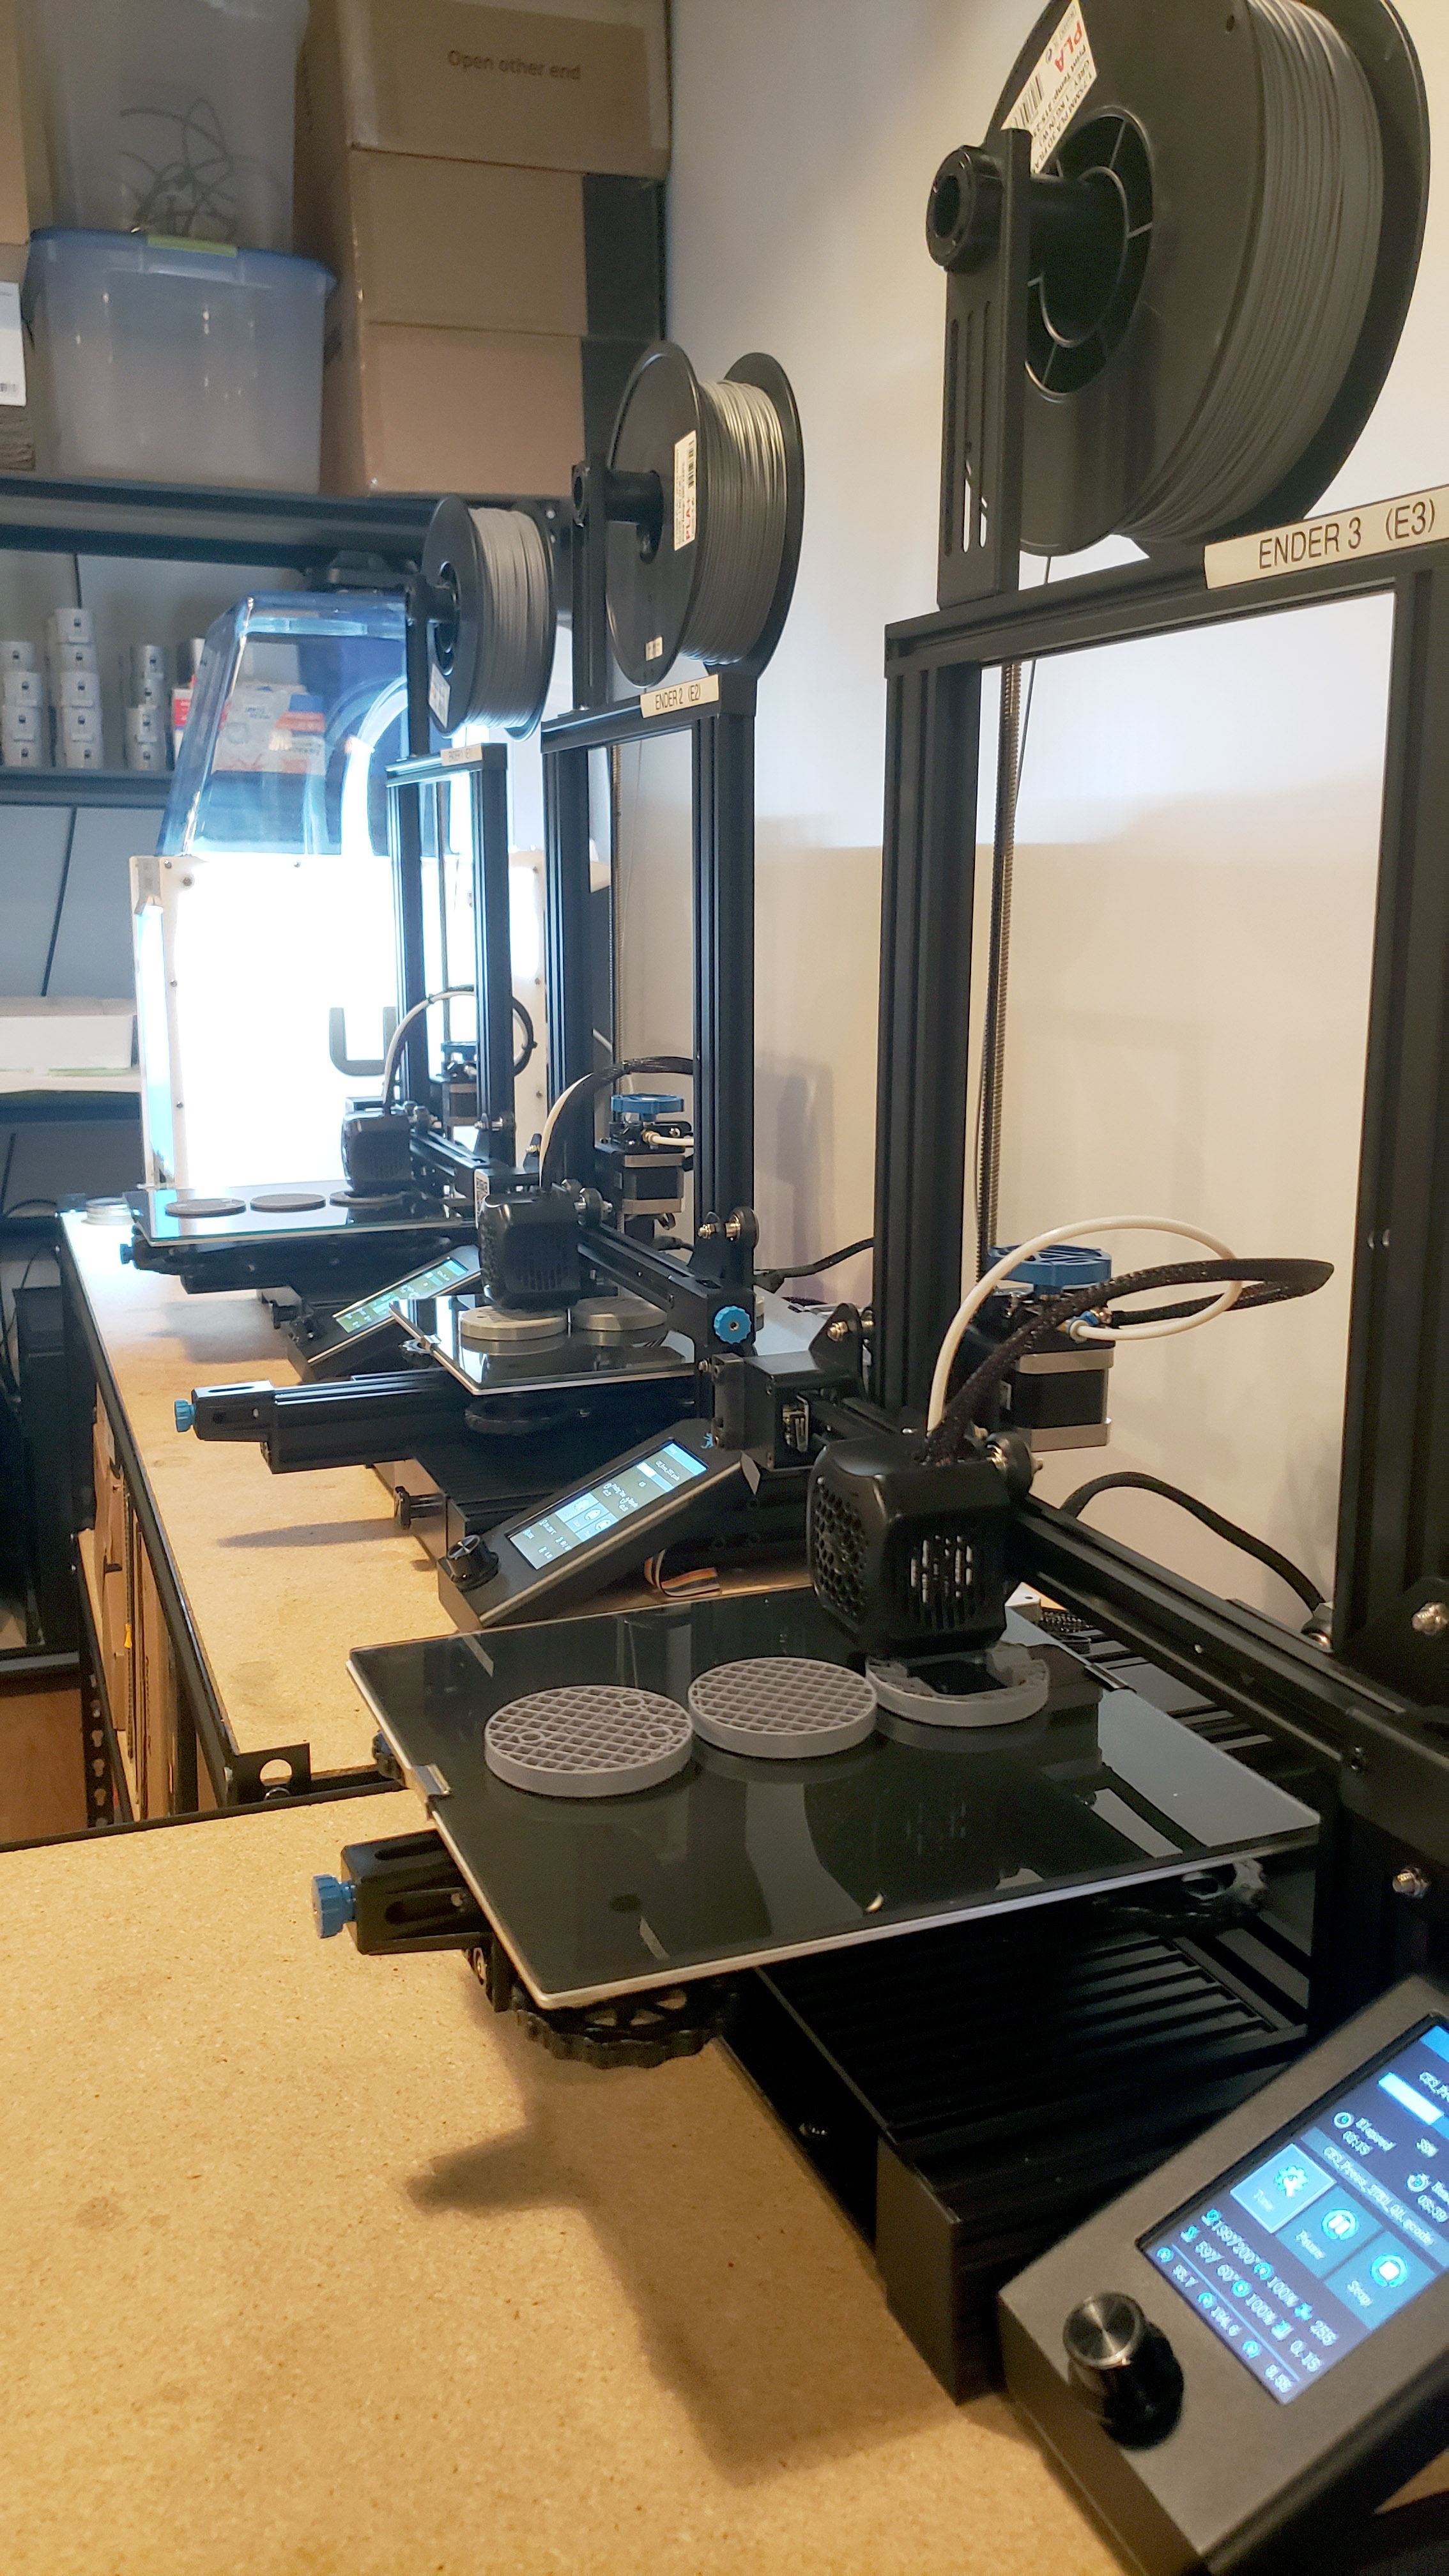
Before scaling up with the Ultimaker, Rob wanted to know if a cheaper printer would be able to make the parts. He’s currently testing three Ender 3 V2s to see if they will work as a long-term solution.
The next challenge was figuring out how to produce the presses repeatably and consistently. Rob started off using the Ultimakers. Once he got the 2+ Connect, he says that it took him a few weeks to lock in a process that worked. Compared to the six months it took to establish the machining processes for the razor head (the most complex part the company makes), this isn’t long at all. He says that his previous 3D printing experience, particularly with the 2+, helped him quickly figure it out.
But before he committed to scaling up with the Ultimaker, he wanted to know if a cheaper printer would work. “As a small business, if we're able to produce on a home or consumer grade printer, at that price point, it opens up a lot of doors for us in terms of production,” he explains. It would also potentially allow the company to drop the cost of its product by $10 to $15. So he added the Ender 3 V2s to his fleet, three of which he’s using to test print razor presses.
Getting the Enders to reliably print the parts took longer than the Ultimakers (four or five times longer by Rob’s estimates), but once again, his previous experience came in handy. “Having already dialed in this process two or three times, I already knew where the problems were going to lie,” he adds. Taking care during printer assembly helped, as did calibration. He says that despite the fact that the Enders printed initial benchmarking prints successfully out of the box, they weren’t able to print presses that were in spec until Rob did a full manual calibration. He says that this process took some time, but after a month he hasn’t had to recalibrate them yet.
While the results have been successful so far, they aren’t final. Rob wants to know if the machines will eventually need modification (for example, an enclosure) or maintenance, and if so, how much. He says that the Ultimakers have been printing for nearly six months straight with no maintenance. The Enders might require more than this. However, according to Rob’s calculations, the amount of maintenance the Enders would need to make them not workable is high. “The price difference is big enough that the Enders can require quite a bit more and still win the day,” he says. This allows the company to add additional machines for redundant capacity while performing any maintenance needed.
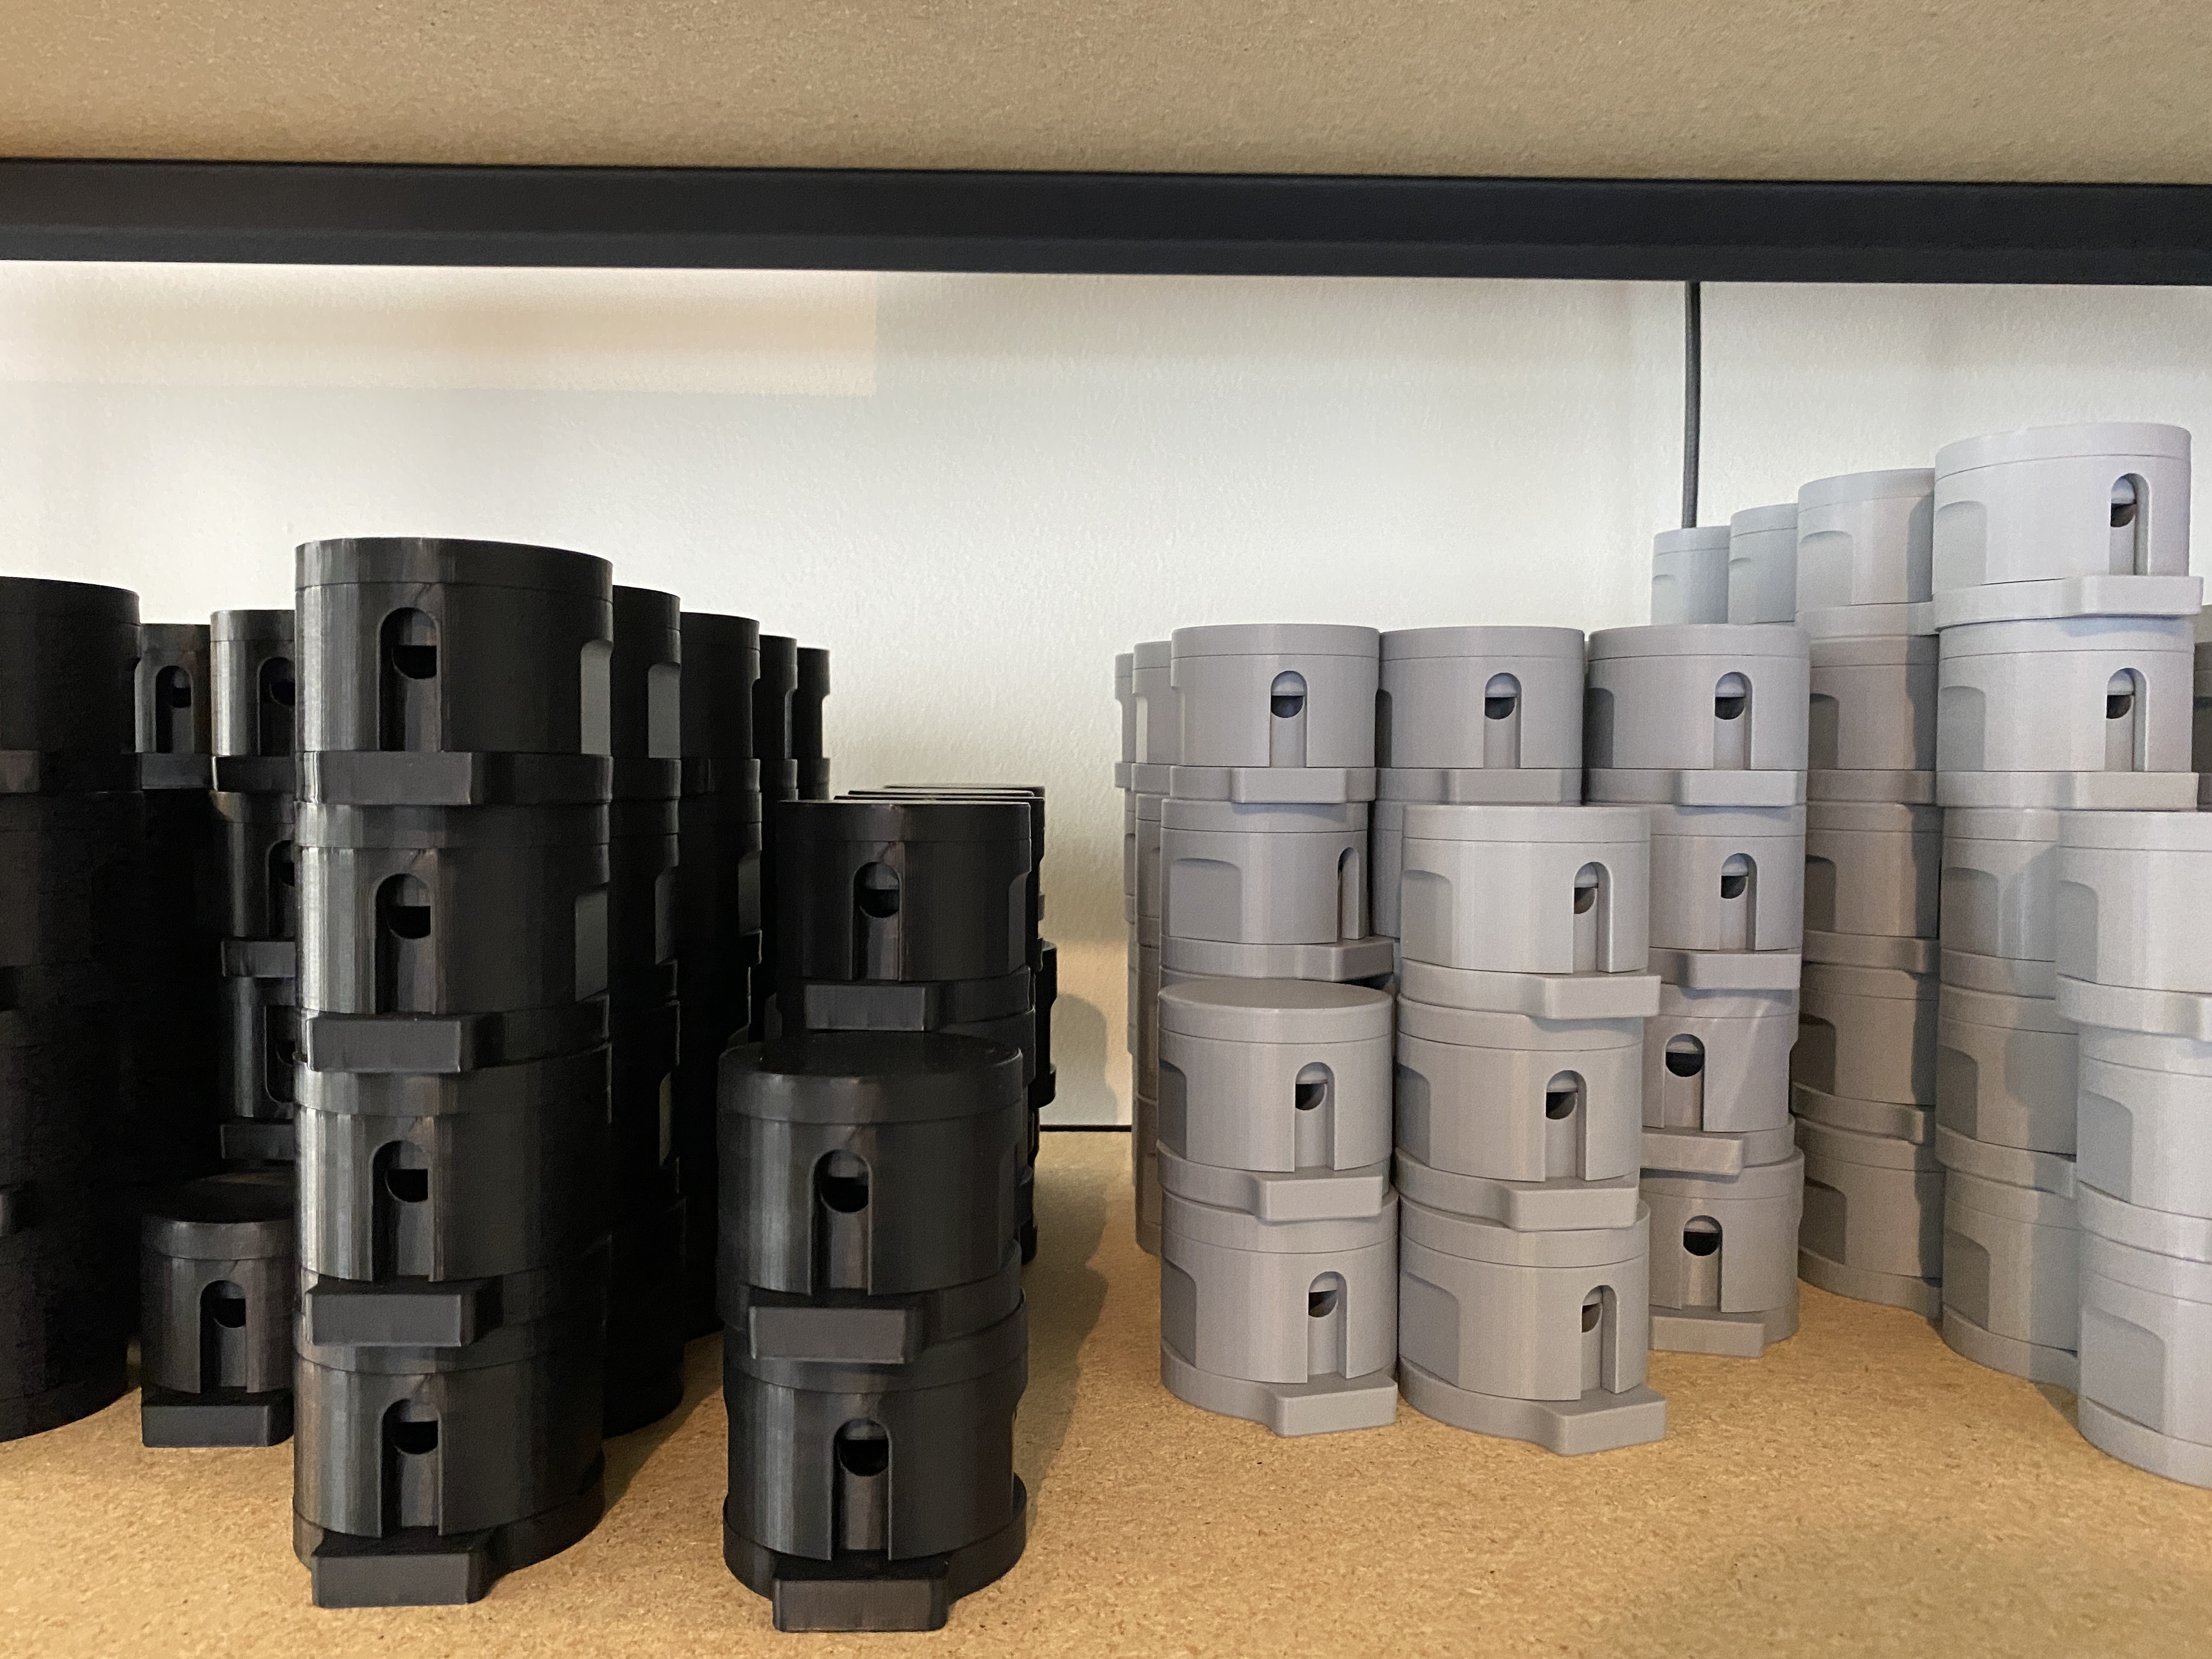
Each of the machines can print four presses per day. The press consists of three components, and the machines’ print beds can hold three units (nine total components) at once. Each machine runs three units overnight and one during the day. The print times on the Enders are slightly longer than on the Ultimakers, but still within the window of time that makes it workable for Rob’s day.
Holding Out for a Hero
Rob notes that it’s unusual to see a final consumer product that’s produced via FDM. “I can't think of many products where the usable product can be acceptable as this, unfinished, layer lines, maybe some flash coming off,” he says. “These are nice parts, but they're still not perfect.” He thinks that customers are willing to accept the press as-is, though, because it’s a secondary product to the razor. “Our tactic is we lead with the razor because this is the shaving implement,” he explains. The press is just a tool that enables the novelty of getting a multi-blade shave with the ease of a cartridge razor for 10 to 20 cents per blade. “I believe that that takes away a lot of the expectation for what the press needs to be, because it's not the hero,” he adds.
Rob says that the majority of users accept the 3D printed press for what it is. “Most people have been so enamored with the shave, that they're just like, oh, yeah, that's what it takes to get me there.” However, he says there is a small subset of people who have difficulty accepting an FDM product. People who have their own desktop printers often question why they can’t just print the part themselves. Rob has considered selling STL files (after all, this started off as an idea for an open-source razor), but he believes that wouldn’t work in this case. The machine needs to be calibrated exactly in order to print presses that are in spec. If the press isn’t accurate enough, it won’t work with the razor. “These things (the razor and press) are integral to each other,” he explains.
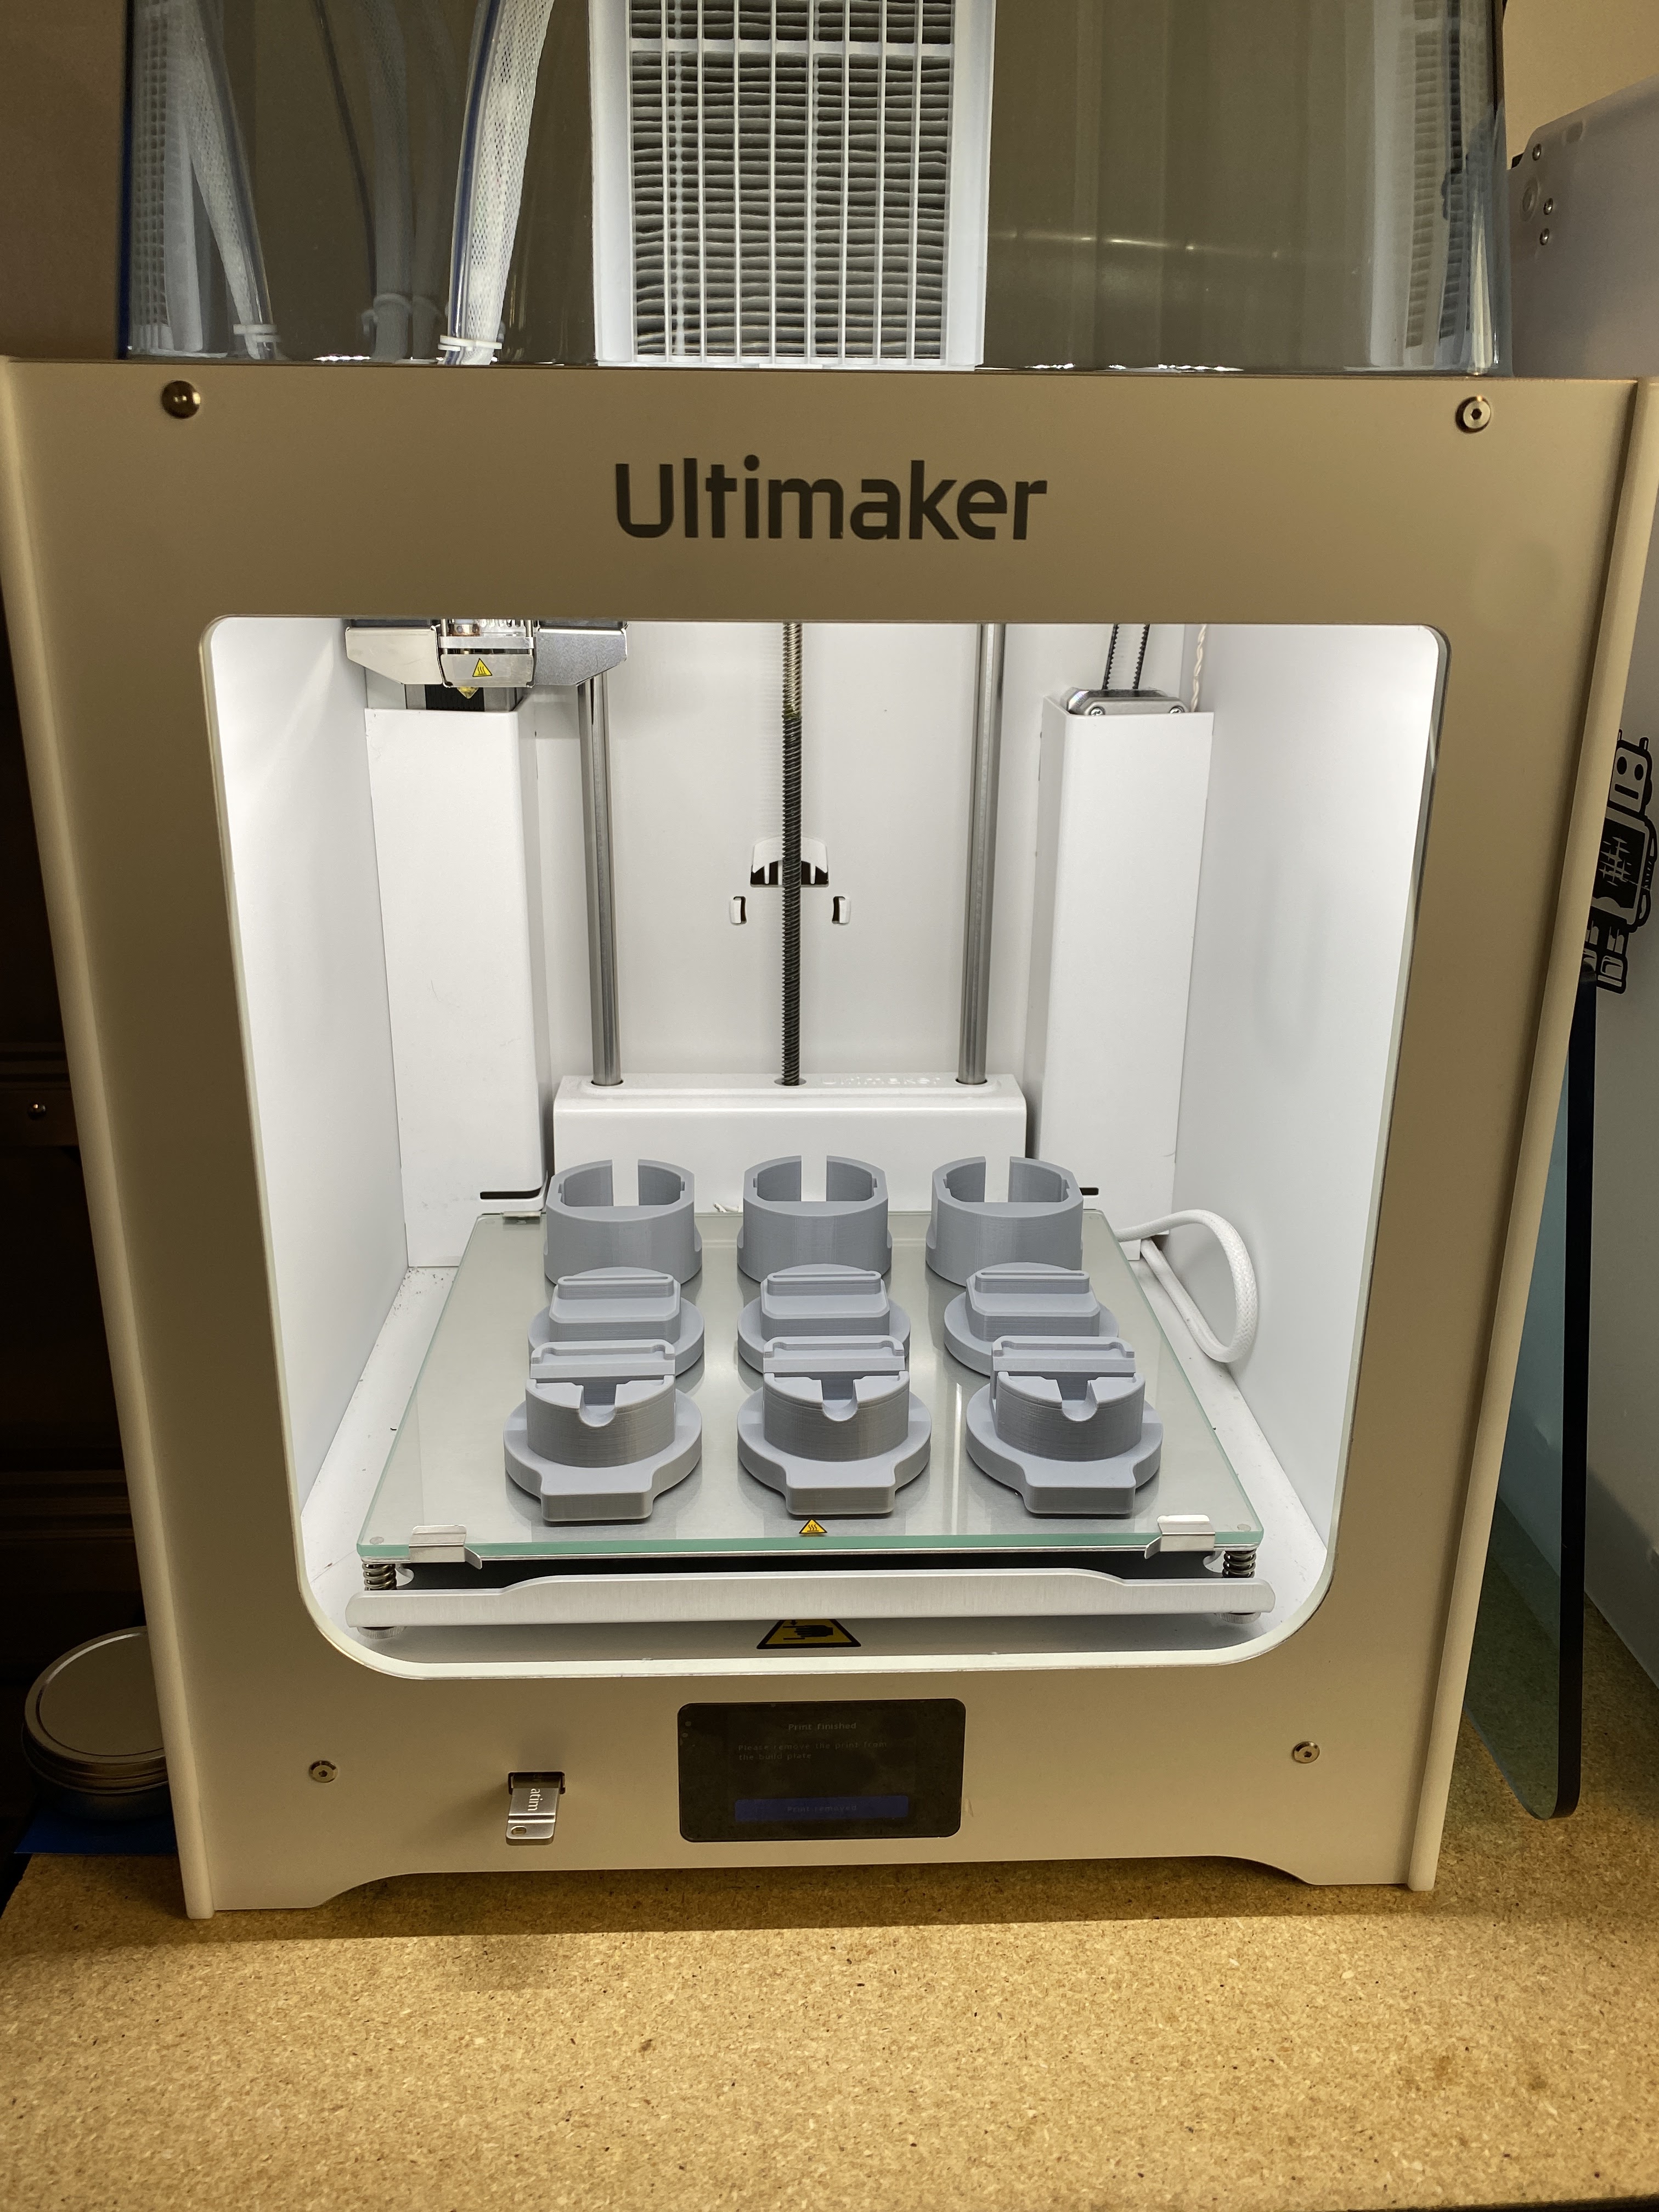
Currently, Maxwell June has four printers (three Enders and one Ultimaker) dedicated to razor press production. With each printer running for 25 days each moth, the company can produce 400 razor presses per month.
Scaling Up
Currently, with four printers dedicated to printing razor presses for 25 days each month, production rates are 400 per month. “We're not at mass production, I would say, but we are at a spot which is pretty close to being scalable,” Rob says. How the company scales up depends on how the Enders work. If the maintenance doesn’t become a problem, “it could scale until we run out of power or room.”
As for when the company would consider moving from 3D printing to another process, such as injection molding, Rob doesn’t have a set point in mind. “We question what the scale is that we would stop 3D printing,” he says. “I’m not sure what that is.”


Related Content

ActivArmor Casts and Splints Are Shifting to Point-of-Care 3D Printing
ActivArmor offers individualized, 3D printed casts and splints for various diagnoses. The company is in the process of shifting to point-of-care printing and aims to promote positive healing outcomes and improved hygienics with customized support devices.
Read More
How to Build 10,000+ Shot Molds in Hours
Rapid tooling isn’t so rapid when it takes days to 3D print a metal mold, and then you still must machine it to reach the necessary tolerances. With Nexa3D’s polymer process you can print a mold in hours that is prototype or production ready and can last for more than 10,000 shots.
Read More
How to Improve Polymer AM Productivity 20X
A fast cycle time is critical to efficient production 3D printing, but it’s not the only thing. How you choose the right parts for AM, prepare jobs for production, and manage post processing will have just as big an impact on total 3D printing throughput. It all needs to work together to achieve maximum productivity.
Read More
8 Cool Parts From RAPID+TCT 2022: The Cool Parts Show #46
AM parts for applications from automotive to aircraft to furniture, in materials including ceramic, foam, metal and copper-coated polymer.
Read MoreRead Next

Hybrid Additive Manufacturing Machine Tools Continue to Make Gains (Includes Video)
The hybrid machine tool is an idea that continues to advance. Two important developments of recent years expand the possibilities for this platform.
Read More
3D Printing Brings Sustainability, Accessibility to Glass Manufacturing
Australian startup Maple Glass Printing has developed a process for extruding glass into artwork, lab implements and architectural elements. Along the way, the company has also found more efficient ways of recycling this material.
Read More
4 Ways the Education and Training Challenge Is Different for Additive Manufacturing
The advance of additive manufacturing means we need more professionals educated in AM technology.
Read More